This was a tip from a patient – less a recipe, more an idea…. If you still have pumpkin seeds to roast leftover from Halloween here is a great way to do it! Try this new twist on roasted pumpkin seeds.
Ingredients for roasted pumpkin seeds
Raw pumpkin seeds
Butter (unsalted or salted)
Salt (if using unsalted butter)
Directions
Preheat oven to 350 F . Melt butter – I used about 1/8th of a cup – stir in raw pumpkin seeds to coat and spread on a foil lined baking sheet. I used unsalted butter so i sprinkled the top with salt and then baked – around 15 minutes until golden,
This was a new twist for me on pumpkin seeds which was so super tasty I couldn’t believe it. In fact they were cooling on my stove when a friend came over and started eating them and then asked me what the heck I did to them to make them taste so good… so thank you patient (you know who you are) who mentioned this one to me this week. You made my pumpkin seeds extra good this year. This one is also super keto friendly if you care about that. Also makes the pumpkin seeds extra dangerous since it is super hard to stop eating them.
Give it a shot or save the idea till next year – but let me know if you try it – I ended up storing the leftovers in the fridge but I am sure they would be fine on the counter too – I do keep some butter on the counter in a dish so I’m sure that it would be the same – it’s not like they willlast long….
I have been wanting to put this recipe up here since the summer. My mother in law (Ruthie) made this (twice apparently but only once when I was around) and it was so good that i nabbed the recipe with the intention of listing it on the blog… I wanted to wait until I made it to actually put it up here – and yesterday – I did! So here it is – slow cooked pulled pork and caramelized Onions!
What you will need for the pulled pork
Pork shoulder roast
1.5 tsp smoked paprika
2 tsp black pepper (I omitted this – my son Leo doesn’t love spice)
1 tsp Cayenne pepper (I used chipotle this time)
dried thyme 1 tsp
garlic powder – 1 tsp
Directions?
Literally just mix all the dry ingredients together and rub all over the roast. Place roast on rack in slow cooker and place one cup of water in the bottom of the cooker being careful not to wash of the rub from the roast. Cook on low for 8 hours.
Remove from heat and allow to cool enough so you can handle it – here is the messy part – separate the fat and sinew and discard as well as discarding the fat and water at the bottom of the cooker. Place the meat in a bowl and pull apart with two forks until desired consistency is reached – add your favourite BBQ sauce or none at all – it is so yummy!
Ok but what to do with pulled pork
Sandwiches for my husband Ryan for sure and for me a pulled pork salad bowl (so good I had it today for lunch I will post that one next week – it is super simple to make with the leftovers or just intentionally with this pulled pork.
For Ryan He loves a crusty bun with pulled pork, caramelized onions, pickles, cheese and hot peppers – so good and messy… Also this meal goes a really long way – I bought two pork shoulder roasts from Costco for $26 which I thought was really good but one of my patients said you could get it at an even better price. One roast will feed us for several meals this week for sure.
Caramelized onions – a great topper for pulled pork
So this is super easy but does take a while – and frankly I smell like onions all day… sorry to my patients today!
I used a whole bag of regular cooking yellow onions (but lots of people use sweet ones)
around 3 tablespoons unsalted butter
1 tablespoon of olive oil
1-2 tsp of brown sugar
around a teaspoon of salt.
So here I just melted the butter and added oil then the onions (peeled and sliced really thin – I used a food processor for this step), brown sugar and salt. Cook stirring very often on medium to low heat – this part takes ages to brown up slowly and release the natural sugars in the onion – around an hour. Yep and hour. Ya my house and me kinda stink – even after I showered. I like to diffuse the essential oil Purification in the house (by Young Living) to help with the smell. So delicious and actually worth the hour. But I do a ton at once in a big pot and then refrigerate – I am going to try freezing some this time to see how it works…
So there you have it – super simple and so tasty…. let me know if you try it!
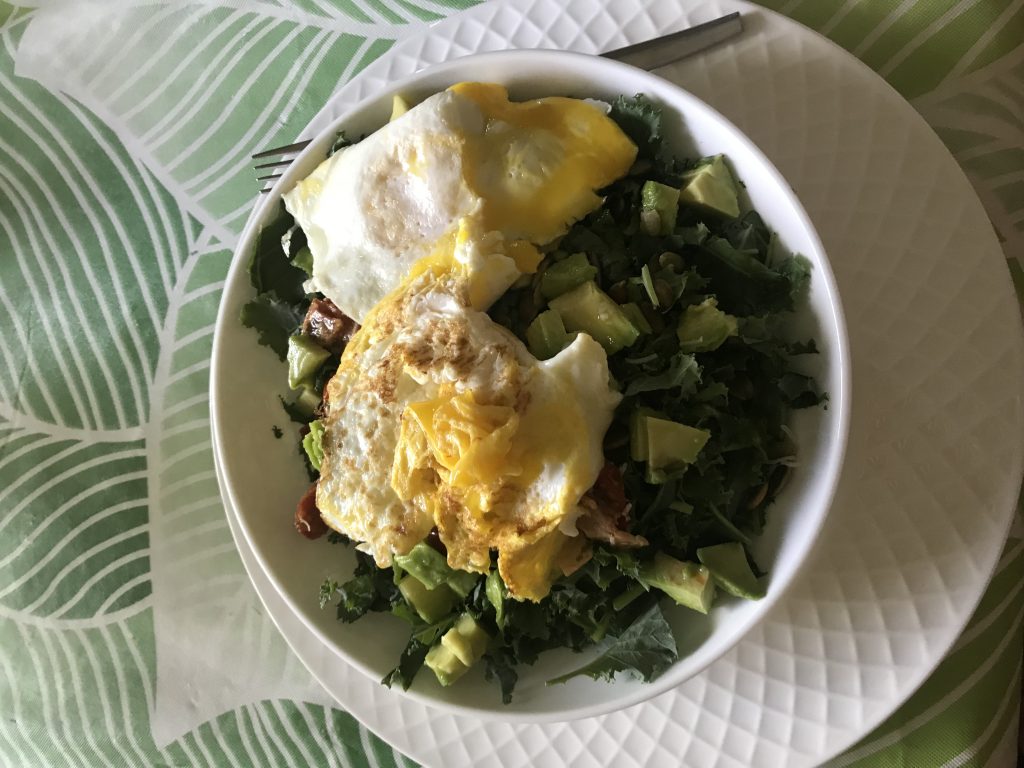
I do this a lot – this salad bowl I made from leftovers in my fridge turned out so yummy I thought I would write it down so I could replicate it. The concept though can be used in your own fridge on whatever happens to be left over in there really anytime – all you need are green things, an avocado, some nuts or seeds, fruit and cheese, olive oil and vinegar and you are in business. Let’s get down to making this yummy and healthy leftovers salad bowl!
Just looking at this again makes me want to make it
Ingredients
Remember for the leftovers salad bowl just use whatever leftovers you have…. here is what I used:
Kale (shredded into very small pieces – I use scissors to cut it)
leftover broccoli and cauliflower rice
one small avocado cut in bite sized chunks
baked leftover rainbow trout broken into small pieces
See I mean it – check out the tomato recipe – this link takes you to the last recipe I posted – I saved the leftovers in the fridge and threw it into this salad bowl – so yummy!
Directions
Really this is pretty self explanatory but here is what I did. On the bottom I but finely shredded kale and threw everything else on top including dressings and then top with the eggs. Really that is it. Super simple and can be varied with any proteins you happen to have laying around – just grab the key ingredients and throw it together… something that I thought was really important for texture was to shred the kale really small. Ok, now I’m hungry… time to go make it again!
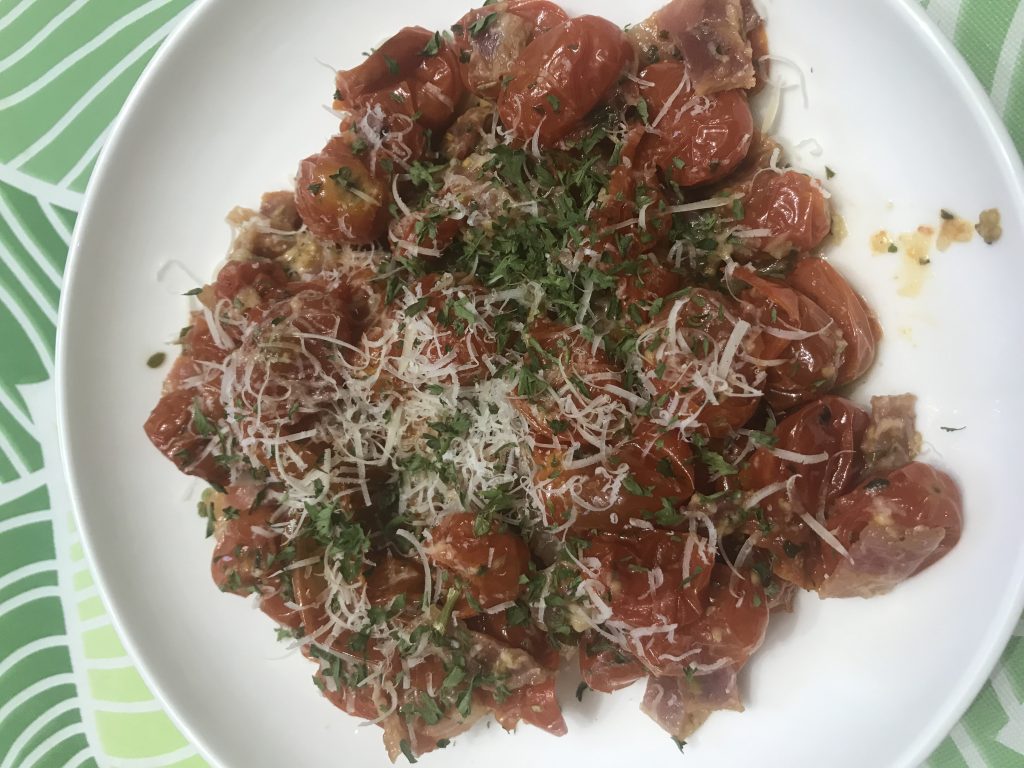
Ever set out to make one thing and it just didn’t work out because you were missing ingredients? Well that is what happened to me last weekend and this warm tomato and bacon salad was created instead! Yay for happy co-incidences. This turned out so well that I will make it on purpose again soon!
Here is what happened: I wanted to make the bacon wrapped cherry tomatoes I posted the recipe for last week… I went to the fridge and took out the tomatoes and bacon and the package of bacon looked weird. Not in a good way… was 3 weeks out of date (oops – I HATE that). Ok, so now what? I had all of these tomatoes that were on their last legs and I had to do something…. here is what I did instead:
Ingredients
a large container of cherry tomatoes
cooked bacon (5 slices or so) – I always have precooked bacon in the freezer as a life hack – I buy precooked refrigerated from Costco and toss it in there… best thing ever.
flavoured olive oil (or regular but I used cilantro and onion flavoured oil)
fresh ground pepper and salt to taste
parsley
fresh Parmesan cheese
Directions for warm tomato and bacon salad
This is super easy. Toss tomatoes in bowl with 2 Tbsp oil, pepper, salt and some parsley as well as the bacon cut up into small strips and then place on a tray covered in tin foil and bake at 350 F for about 15 -20 minutes – I did this in the toaster oven. Once done grate Parmesan over top to taste, mix and garnish with more parsley and Parmesan. This was a great side dish for a Rainbow Trout my husband baked that night and I used the leftovers cold on a salad bowl a few days later . I will definitely be making warm tomato and bacon salad again.
Um… what? you might ask. Ok, picture this. Hot wings but not… Buffalo Dip but not… This recipe is for an amazing Buffalo dip stuffed chicken breast. It is pretty easy on prep if you buy a buffalo sauce (like a wing sauce) but I will also add a link for a home made buffalo sauce that is super tasty. Ok so get ready for Stuffed Buffalo Chicken!
Ok, now my mouth is watering
Ingredients
Here is what you will need
4 boneless skinless chicken breasts
cream cheese (four oz softened)
1/2 cup shredded mozarella
buffalo sauce (about 1/2 c) – here you can buy one like Frank’s red hot wing sauce or make your own Buffalo Sauce
parsley, salt and pepper
blue cheese dressing
chives 2 tbsp chopped
Directions for Stuffed Buffalo Chicken
Preheat oven to 400F. In a bowl combine cream cheese, 1/4 cup buffalo sauce, cheese and chives, season with parsley, salt and pepper. Cut a pocket in each chicken breast and stuff with a quarter of cheese mixture each. Place on a tray or baking dish and sprinkle lightly with salt and pepper to taste and bake around 30 mins. Set oven to broil and brush remaining sauce on top of chicken, sprinkle with chives and parsley and broil until golden (around 6 mins) . Serve with blue cheese dressing.
Doesn’t that sound amazing? Perfect for keto diets and football season right?
What amazingness are we talking about? Still have cherry tomatoes in the garden – Yep bacon wrapped cherry tomatoes is a thing…
Ok, so I admit, I have been off the keto wagon for a while during the summer and my pants are a bit tight… so fall is here and it’s time to do something about it. You know me, I wont sacrifice taste for pretty much anything so this recipe is keto and has bacon. What else do you need? Here follows the super easy, always tasty bacon wrapped tomato recipe.
Yummy looking right?
Ingredients
Here is the short list of what you will need for this super easy recipe
cherry tomatoes (one small container)
olive oil (I like using chipotle flavoured – gives it a zip! or tuscan herb flavoured but you can use plain) – around 1 TBSP _ I love buying my flavoured oil near the cottage at Southampton Olive Oil Company – you can order it online if you like too!
6 slices uncooked bacon
basil (fresh or dried) – around a teaspoon – chop fresh up very small if using fresh stuff
salt and pepper to taste
Super easy directions for bacon wrapped cherry tomatoes
Preheat oven to 375 F, prepare a baking sheet with parchment paper or foil. Mix oil and seasonings in a bowl and toss tomatoes in it. Cut bacon in half lengthwise and then in thirds and wrap each tomato in a bacon securing with a toothpick.
Bake until the bacon is crisp (about 25 mins)
Admittedly this recipe for bacon wrapped cherry tomatoes is a bit fiddly… I mean the title of the recipe does imply that doesn’t it? But super tasty and keto friendly and would work great as an appetizer at a party.
Ok, still hanging on to the last vestiges of summer – and I’m going to at least through September and maybe October… so with that here is a yummy summer inspired recipe that is keto friendly (because who didn’t eat and drink too much patio and cottage food this summer?) I cant wait to try it soon – maybe next week – zucchini burrito bowls with shrimp!
Ingredients
Here is what you will need for your zucchini burrito bowls
3 or 4 small zucchini halved and with insides removed (score it into cubes and scoop out and reserve 1/2 of the zucchini for the rest of the recipe)
olive oil (around 4 tbsp)
half of a small sweet onion chopped
2 cloves garlic minced
small shrimp peeled and deveined – around 1.5 lbs – best if raw and uncoocked
packet taco seasoning (use 1/2)
1/2 cup corn thawed
1/2 cup black beans
Tomatoes or cherry tomatoes chopped 1/2 cup
one cup shredded cheese- italien or pepper jack or your fave
cilantro if you like it
chopped avocado
sriracha mayo to taste
Directions for Zucchini Burrito Bowls
Here is what you do for your zucchini burrito bowls…
Preheat oven to 350 F and place zucchini bowls in a baking dish – baste each with oil then bake 12-15 minutes until mostly tender. Remove this from oven. Meanwhile heat 2 tbsp oil over medium heat and cook onion and scooped out zucchini until soft – about 5-6 mins. Then stir in garlic and stir for about 30 seconds – add shrimp and taco seasoning cooking until shrimp turns pink and opaque. Stir in corn, beans and tomatoes until heated. Spoon mixture into zucchini bolws and top with cheese and place in oven and bake until cheese is melted. Then top with cilantro, avoocado and salsa or sriracha mayo.
With out last long weekend of the summer approaching I thought this would be a good topic to re-visit! Here are some ideas, home remedies and our grandparents tricks and tips for sunburn… Of course the best idea is not to forget the sunscreen right?
Ok, ok, forgetting sunscreen does happen …
Everybody at some time or another has decided to take a
fabulous vacation out to the beach, the desert or someplace else that they
normally do not venture.
The trip is always wonderful, filled with fun and somehow in
the excitement the sunscreen is forgotten, or you are so wrapped up you stay
out a bit too long.
This has happened to practically everyone capable of walking. In order to avoid all of the pain that sunburn creates it would be necessary to live our lives entirely indoors, and this just is not much fun. After all, then there would be no baseball games, no swimming on the beach and plenty of other great activities.
First choice? Sunburn Prevention
In order to calm the intense pain that sunburn can cause it is important to know how to treat them. Of course, prevention is always the best advice, but for those times when a burn is unavoidable, it is important to know the proper treatment methods. These can help you to avoid screaming in pain each time you lay down to sleep, and also allow others in your family to come within 50 yards of you. Without a good treatment plan you can expect to be extremely lonely, so now is the time to start learning before you are burnt to a crisp struggling to read the screen.
Before we get started, it is extremely important that you always wear sunglasses whenever you are outside. Even if you only plan to be outside for a couple of minutes, something can always happen where it is hours before you go inside. Treating a sunburn in your eye is much harder to do and is not something that is easy at all. It will also require the specialized attention of an eye doctor to ensure that your vision is not damaged.
Ok, whats done is done – sunburn, now what?
ouch! sunburn…
So you have a minor sunburn? Now what – here are some remedies – but remember if it is more than a minor burn all bets are off and you need to seek medical attention- ok?
One of the first remedies for sunburn that you should try is always drinking ample water. This is important because it helps to ensure that your body is fully hydrated.
If you are dehydrated, it will cause your skin to dry out,
which in turn can make it extremely difficult to soothe your skin to a level
that is comfortable.
If you are dehydrated, your skin is going to have a much
harder time healing. Drinking plenty of
water will be extremely helpful to ensure that you are getting all of the
fluids that you need, not only for your health but also to improve the shape of
your skin.
Another highly effective solution for sunburn is to use aloe vera. This is available in the form of gels, but can also be used directly from the plant. If you have access to an aloe vera plant, it is a wonderful way to ensure you are protecting your skin. If you have an aloe plant, you have access to a great asset.
Used for more than just sunburn, an aloe plant is also highly effective for a plethora of other burns as well.
You can also use cool milk compresses. It is important to use cool milk, not cold. If you use milk that is extremely cold, you will often find that it is extremely uncomfortable to the touch and is more disturbing than comforting. Using hot milk is also not effective since it will not properly soothe the skin. To get the biggest benefit possible from the cool milk compresses you should take some cotton gauze or even some very soft cloth and soak them in milk. You will then dab the compress onto the skin. I looked this one up and apparently the Vitamins A and D help the skin to heal… It is important not to use it on any skin that is broken – no infections please!
Final thoughts
With some patience, all sunburns will of course heal. Trying to wait until they heal all on their
own is not always possible. This can
make it extremely difficult to work, get the rest you need and also function. A small amount of relief is always a welcome
benefit for most people and is something that should never be discounted. Getting relief is possible and your skin will
certainly appreciate the help.
For the simplest issues that can be wrong there are times when a home remedy can be the perfect solution. Trying to decide if a home remedy is the best solution for your needs is something that should be determined based on your own particular situation, rather than trying to compare your situation to that of someone else. It is also extremely important to realize that there are times when a doctor is much better equipped to handle your problem, or another professional. Trying a home remedy is all about saving money, using natural solutions and also ensuring safety.
A word to the wise…
With this in mind, it can be a lot of fun to venture off to find the perfect home remedy for whatever ails you. Just be very sure that you are looking for a home remedy that is safe. If you are looking towards home remedies that are a bit dangerous, you could find that you are encountering a lot of complications and also putting your health in severe danger. It is extremely important to closely monitor situations to ensure that safety is a key concern but also ensure that you are giving proper attention to the remedy.
Many people swear by home remedies. They very rarely even venture to the doctor and due to this they can avoid most doctors’ visits, ensure that they remain healthy and also reduce the amount of medication they are required to take during their life. It is extremely important to understand that while a home remedy can solve many problems, there are some situations, which will require a visit to the doctor. As long as you are able to safely distinguish between the situations that require a doctor’s attention and those which can allow you to use a home remedy you can typically use the remedies quite safely.
Be Smart about Home Remedies
The simple reality is that as long as you are dealing with an ailment that is rather small or minor home remedies can be the perfect solution. It is extremely important however to ensure that you see a doctor for any serious problems. A great home remedy can often be better than a doctor simply due to the ability to be carried out in the actual home, rather than being forced to seek treatment in a doctor’s office, which can often be cold and unfriendly. Being able to provide simple treatments for simple problem in the home is a great way to improve your health as well, rather than having to wait until you are completely ill before seeking out treatment, many people start administering home remedies at the very first signs of problems and sickness.
Some last thoughts…
With home remedies offering natural treatment options it can
also be compared to a much greener lifestyle.
Home remedies will almost always allow you to use natural ingredients
that are not harmful to the body at all.
This makes many of them extremely safe, and can also allow them to
frequently be used even for young children, rather than needing a separate
medication to treat children and adults.
Of course, home remedies are not for everyone, they will typically
require a bit of additional time and patience in order to actually successfully
treat the ailments. Also please remember to do your research and ensure your
remedy is safe!
Home remedies should not be used instead of going to the doctor – but rather
for solutions to simple problems – remember if the problem persists or changes
you need to visit your doctor – Doctor Google isn’t a good solution and will
only scare you!
Some of my favourite home remedies:
Essential oils – Thieves by Young Living – diffuse during cold /flu season and during a cold, peppermint oil on the temples for headache.
Crushed Dandelion leaves – for treatment of small warts
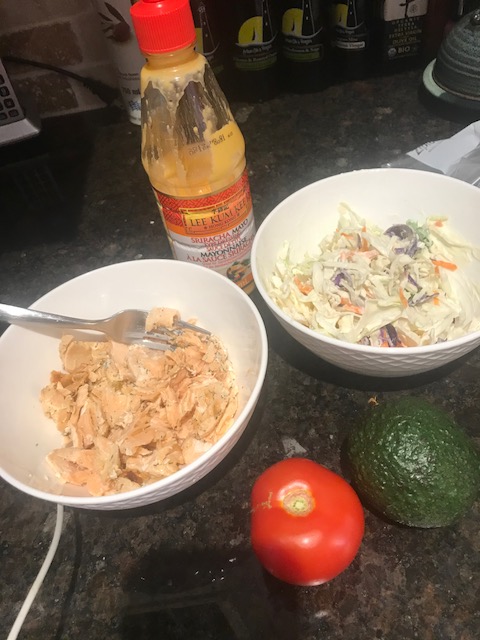
We have two weeks left before school starts – lots of lazy summer to go … here is a super easy recipe I threw together with leftovers and loved so much that I made twice more on purpose: a super yummy summer Salmon Bowl. It literally took about 5 minutes to prepare (if you have left over salmon to warm up). This is in single portions but can easily be doubled, tripled or quadrupled for the whole family…
Salmon Bowl ready to eat
Salmon Bowl pre-assembly – so simple!
Ingredients for Summer Salmon Bowl
one cooked salmon filet warmed up and smashed
small tomato chopped
half of a ripe avocado – chopped
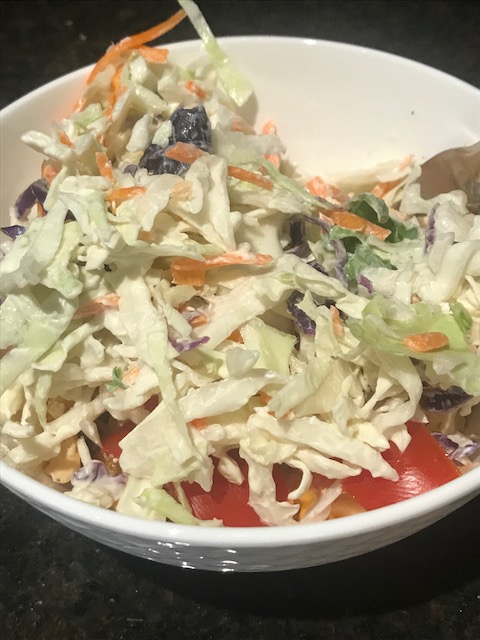
two or three handfuls shredded cabbage (I just bought a bag from the grocery store)
mayonnaise to taste
sriracha mayonnaise
Directions
This can be warm or cold but I did like it better with the salmon warmed. All other ingredients stay cold… Its a nice contrast. Here is what I did. Put the salmon in a bowl and warm in microwave as desired. Smash with fork so it is in pieces at the bottom of the bowl. Place diced avocado and tomato on top and a squirt of the Sriracha Mayo or just plain Sriracha sauce. In a separate bowl mix shredded cabbage and mayo to desired consistence then place on top of the other ingredients. Eat and enjoy – really that’s it!
It has such nice contrasting flavors and consistency I really liked my accidental leftovers invention and will make it on purpose again for sure!
This one is also keto friendly!
For me this was great for lunch but would also be super tasty for dinner in the backyard with a nice glass of white wine. Let’s keep that summer evening patio thing going as long as we can!!! Who’s with me?