Home made Mac and Cheese

My Husband’s Flipping Awesome Mac and Cheese

Note hole in mac and cheese on left where I stuck in my fork for a couple mouthfuls right out of the oven…

So one day before Christmas my husband Ryan decided to make Home made Mac and Cheese. He didn’t have a recipe he just made it up in his head… and it was one of those that looked so good when it came out of the oven that I decided to take a fork right out of the drawer. I ate some and looked at him and I said “this is Flipping Awesome”. Except I used a different F word.

Generally in our house my husband is not the cook. Except with BBQ, chili, sandwiches, grilled cheese and omelettes. In these categories he reigns. But for him to decide to make something, without a recipe, is rare. F-word Awesome is rarer still so I asked if he could write down what he did so I could share it.

Usually I would write a healthy recipe

First week of January right? Usually I would include some uber-healthy recipe but this one does not fit that category… we can get to that next week … this home made mac and cheese was so good that I have to share it now because I don’t want to forget to do that. And selfishly I want a record.

Ingredients

Here are the things you will need for Home made Mac and Cheese
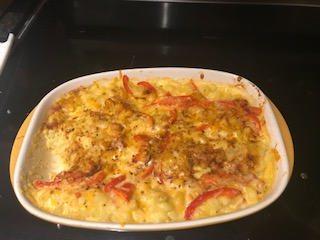
500 g Tortiglioni

1/4 c unsalted butter melted

500 g shredded marble cheese

1 c milk (we used skim)

1/8 c flour

5 pieces thinly sliced pre cooked bacon

One red pepper sliced julien

bread crumbs

paprika

club house tex mex seasoning

Directions

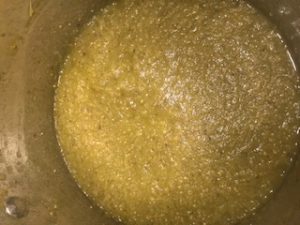
For the flipping good home made mac and cheese here is what you do: Cook pasta al dente or a bit under cooked. Melt butter and add milk – make a roux with the flour adding slowly and whisking. Heat and then add cheese (reserving some to top casserole dish with) till melted. Pour sauce over noodles, add bacon and mix and put in 9×11 casserole dish. Top with a bit more extra shredded cheese, bread crumbs to cover the top of dish and sprinkle with paprika, Tex Mex seasoning and arrange the red pepper slices on top. Bake at 375 F for 20 min.

Voila

Flipping awesome mac and cheese. Comfort food.

Hungarian Goulash and Dumplings

Something a bit different for Christmas?

So usually at this time of year many are gearing up for preparing big meals… Turkey, stuffing, maybe a ham, big platters of fish for Christmas Eve…  I have heard from many people that they may be a bit tired of it.  If you want to try something a bit different check out this recipe for Hungarian Goulash and Dumplings.  *note – above picture is one from the internet not mine but does look similar to what I make – typing this before I actually make this on Christmas Eve…

So, I am usually the one in our family making a big Christmas dinner either on Christmas Eve or on Christmas Day.  This year, my cousin is doing Christmas Day and our Christmas Eve will be a bit smaller and quieter with just a few family members and maybe some friends…  My husband is kinda excited because we have decided to do a smaller dinner on Christmas Eve that we haven’t had for a few years – one of his very favourites:  Hungarian Goulash, Dumplings and spaetzle (prounounced Sh-pet-slae) which are basically German noodles.

Truth be told, I am getting excited too.

The Beauty of this recipe

The beauty of this recipe (or more correctly I guess these recipes) for Hungarian Goulash and dumpling is that the dumplings can be prepared ahead of time and frozen, the noodles can be store bought and made just before (I will do them fresh but lets not go there) and the goulash can be done in the slow cooker.  Leaving you free for a relaxing Christmas Eve with little prep to be done!

Here is how:

Here is the recipe for the Hungarian Goulash and Dumplings:

For the goulash – Ingredients:

4 lbs beef (I use stewing beef but you can use chuck or another roast) cut into 1-2 inch cubes

2 strips of bacon or just bacon fat

6 onions (I use 4-5 yellow and 3 shallots)

4 tablespoons of paprika

1.5 teaspoons of salt

2 green peppers cut up coarsely

Instructions for Goulash

Flash fry the beef cubes very quickly and remove from skillet.  Do this in portions so you don’t overcook the meat.  Transfer to a thick pot (I use slow cooker).  Rinse the skillet with a cup of water and add to the pot.  Then chop the bacon and fry it in the skillet. Add the onion and brown lightly.  Stir in paprika and salt and combine with the meat.  Add the uncooked green peppers and then cook slowly for about two hours on lowest heat possible.  Or on low in slow cooker for 4 hours.   This can also be made the day before and reheated!  Serve with Noodles that can be purchased in most international food sections (Spatzele)  and boiled just before serving.   Also can be served with Dumpling recipe below!

Bread Dumpling recipe 

(Zemmel Knodel)  or Bread Dumpling are awesome with Hungarian Goulash 

6 stale kaiser buns or 300 grams french stick or white bread cut in cubes

30 grams lard/crisco

1 Tablespoon chopped onion

parsley and salt

60 g flour

2 eggs

1 cup milk

Cut bread into small cubes and in a separate bowl mix lard, onions and salt.  Mix all with bread curbs and add flour and mix.  In a separate bowl mix eggs and mil and then pour over bread mix and work with hands into dough.  With wet hands form balls (tennis ball size or a bit smaller) and cook in salted boiling water 12 min.

I make these ahead and wrap each individually in saran and freeze.  Remove from freezer and boil when needed.

Winter blues, Seasonal affective disorder and happy lights

I had a hard time picking a title for this blog post

Lots of people have the winter blues and/or actual diagnosed Seasonal affective disorder that starts around this time of year…  some postulate that decreased amounts of sunlight exposure per day is the culprit.

Symptoms can include:

  • Feeling depressed most of the day, nearly every day
  • Losing interest in activities you once enjoyed
  • Having low energy
  • Having problems with sleeping
  • Experiencing changes in your appetite or weight
  • Feeling sluggish or agitated
  • Having difficulty concentrating
  • Feeling hopeless, worthless or guilty
  • Having frequent thoughts of death or suicide

If this sound familiar please talk to your doctor.  Once you have done that and gotten some help and if you are still looking for more help please read on!

One thing that may help is using a very bright light that simulates daylight coming at you indirectly for 30-60 minutes per day while you are doing something else. You know, like typing a blog article.

I blogged a bit about this last year and recommended a light that some of my patients have gotten from a company called Northern Lights.

Here is the link to my previous article for fun: https://drkarenhudes.ca/index.php/2017/12/09/seasonal-affective-disorder-s-a-d-a-k-a-the-winter-blues/

The patients that have gotten this one, and my awesome friend and chiropractor extraordinaire Emily who also uses it ,  love this brand. (Yes, I guess lots of my friends are chiropractors… school and life and stuff is where I met them).

One draw back – the price tag…  the desk version cost around $200

Good news!

So fall year I was at Costco and what do I see?  I giant pile of a product called “Happy Light” retailing for about $60.00

Cool, I thought and then walked by.

About a week later I felt kinda blah and down.  It had been really grey outside and I thought to myself (for about the 250th time) that I should buy a light for my desk for the winter blues… maybe it would help.

Off to Costco I went.   I couldn’t find the stupid happy light anywhere.  You know how Costco is,  if you don’t buy it when you see it you may never get it again.  Luckily after much searching,  I did find several in the pharmacy.

Consumer report of one

I decided to buy it to test it on me and do a consumer report of one so that I could advise patients (and all of you) to buy it if it works.   If we can help the winter blues for $60 why not?

One of the reasons I sent people to the Northern Lights site was because a family doctor that Emily knows referred her to it originally having said that the wavelengths used in those lights are the ones that help the most.

I did some research.  Apparently it is not agreed upon in the scientific community which light wavelengths are the most helpful.  It should just be a strong white light. Preferably with no harmful UV.

The Happy Light checks both boxes.

How I did with it

I got it back to my clinic and set it up immediately.

Put it around 18 inches away and turned it on to the strong setting.

Had a headache in 3 minutes.

Turned it off.

Headache gone shortly after.

Turned it on to low setting (for afternoon use apparently).

Headache in 5 minutes.


Hmmmm maybe the other light would be better?


Put it farther away from me on the desk – about 2 feet and angled it more away from my eyes.

Turned it on.

ok after 5 mintues but decided to build on it…


I am happy to report that with it about 2 feet away and angled on low I can have it on with no irritation or bother for 30 minutes.  AND I think my mood is better in general.

So I think this one has Costco for the win.  I do recommend it.

I also recommend reading the instructions in the box (which I did not do) and doing the test on yourself for light sensitivity (which apparently I may be so the reading of the instructions would probably have been helpful).

Hope this is helpful!

Potato Latkes

This one isn’t at all healthy but…

Who doesn’t like a fried potato once in a while?  Potato Latkes are traditionally part of Hanukkah Celebrations. They are a great treat – basically they are grated and fried potatoes served with either Sour Cream or Apple Sauce – the great battle over which is best splits families and has raged on probably for over 5000 years.

I’m a rebel, this year I made Potato Latkes for the first time for my family and some friends and I served it with Sour Cream and Apple Butter – I make apple butter every year and was going to post the link to the recipe here but alas I haven’t done a post about that! Crazy.  Will add next week…

Fried potatoes, sour cream, apple butter… It was amazing.

How did this whole thing come about you ask?

It’s actually kinda cute and funny.  I invited a friend and her family over last Sunday.  My plan was to decorate the house for Christmas and make latkes as it was the first night of Hanukkah – Technically we are Christian but my Dad is Jewish and I love the traditions and fun of all cultures really so more to celebrate and experience for me is always a blast.

The friends I invited over are Jewish and at first the mom (one of my closest friends) said they were really too busy – you know how it gets: homework, swimming, birthday party – it was one of those kinds of days. But her 13 year old daughter thought it would be fun so our Christmukkah party tradition was born!

None of them had ever decorated a tree before so all four of them gleefully decorated the tree and put out my Christmas Village while I attempted to make latkes for the very first time (I am GREAT at eating latkes but had never ever attempted to make them before).

  Didn’t they do an awesome job?


Ok, Ok already here is the recipe

This recipe for potato latkes  came from a patient of mine who got it from the Hadasah Wizo cookbook The Kineret Cookbook (hope I am spelling all of that right) – I modified it just a bit because that’s what I do

Ingredients

Feeds 7 people… (it makes a whole mess of latkes!)

5 lb bag of white potatoes peeled

6 eggs

1 onion finely chopped

a bit of salt to taste

3 teaspoons baking powder

6 tablespoons matzah meal (or flour or breadcrumbs I think would work)

lots and lots of vegetable oil.


Instructions

Grate potatoes on large grating section (I used a food processor which made this super easy) and squeeze out as much water as you can – I lay all the potatoes on paper towel to absorb as much as possible.  In a separate bowl beat eggs well and mix in all other ingredients then mix with the potatoes and mix well with your hands.  Cover the mixture well with saran wrap and put in fridge until you are ready to use.  Please use it on the same day.  The benefit of this is that more water comes out of the potatoes.

When ready make small pancake sized handfuls of potato and put 4-8 at a time on a plate (squeeze out extra water when you are doing this).  Drop these into very hot oil and fry on each side until golden brown – about 5 minutes.

Place on cookie sheets in oven to keep warm and then just before serving blot off extra oil. Serve with Sour Cream and Apple Sauce or Apple Butter.


I hope you try this one – it was great and we made such a lovely new tradition with it this weekend!

Now, someone tell me how I can get my friends back over to put away all the Christmas Decorations in January…


Super Easy Instant Pot Bone Broth

Heard Bone Broth is good for you but it takes too long?


I have a simple solution.  Instant Pot. Yes. You can make Bone broth in 2 hours instead of 8 in the instant pot. Literally fill, push button, walk away. I can’t even.

So far since buying this thing I think I am in love with it.

I know some of you probably bought this thing on Black Friday or Cyber Monday right?  Still in the box?

Ok, no worries… let’s fix that.

Bone Broth

So bone broth is all the rage in the health set and with Millennials… why?

Bone broth is rich in minerals, collagen, glutamine, glycine and proline… what it boils down to (like my pun?) is that it is said is good for the gut (decreases inflammation and is healing). Also the collagen is good for joints and minerals are essential for cellular activity.  Said to be good for joint pain, weight loss and a miracle cure for stuff (ummm prob not but…).  Really it’s an awesome source of good stuff.

So again, here is my theory – Our grandmothers knew stuff, we should really listen and do the stuff they said.  Mine made tons of soup out of bones and so did my mom.

Here is how

Ingredients for Bone Broth Soup

Water

Bones (beef, pork, chicken or whatever you have)

carrot or onion

Apple cider vinegar (the one with the stuff in it – it helps pull the minerals out)


Stick bones on rack in your instant pot and fill with water to just about an inch below the fill line.  Stick in carrot and a gulp of apple cider vinegar.  Set instant pot on high for 2 hours and leave, just walk away…. let vent naturally and that folks is it.  Flavour with salt to taste.


Here is the best part…  you can use the bones 3 times in the instant pot for soup!


Happy Soupping (is that a word?)

Easy and Impressive Creme Brule Recipe

Do you order Creme Brule only in Restaurants?

Think Creme Brule is a super impressive dessert?  Way to fancy to be able to make at home?  Would you believe me if I told you it was dead simple and that the recipe I have been using for years is so good that I don’t bother ordering it at restaurants now because mine is better?

Wanna impress a dinner party?

I’m a gonna give you my recipe because I’m nice like that…

You do need a few “hardware” kitchen gadgets before you start…

Here they are

6 Ramekins (the cute little white dishes they serve creme brule in)

kitchen torch and butane (don’t be scared its just a lighter on steroids – you can get this at any kitchen store)

large pyrex baking tray for a lasagne for example (9×11 will do)


Got it?


ok, lets go


Ingredients

Here are the food items you will need for creme brule

heavy cream (35% whipping cream) 2 cups

white sugar 1/2 cup

a whole vanilla bean (scrape out inside or use good quality vanilla paste)

5 egg yolks


Instructions

So while this is neither hard nor involved, making creme brule does involve some chemistry… please follow these directions exactly…

Preheat oven to 325 F

  • Temper cream and vanilla – this means just put it in microwave for 2 minutes stirring at one minute and make sure it doesn’t burn or boil.
  • mix sugar and egg yolks in a separate bowl
  • slowly add cream and vanilla to yolk mixture while stirring or whisking constantly.

Thats it. Really.  Now just pour into ramekins and put in pyrex dish and use the dish as a water bath and carefully fill the pyrex surrounding the ramekins with water so they are bathed up to about 2/3 of their height.

Bake 30 minutes or until the creme brule jiggles like jello when you take it out. Cool in fridge till cold (overnight) I usually put saran wrap on top of each ramekin…


Then before serving add a little white sugar to the top of each and tilt dish so it covers the top and dump out excess sugar.  Then caramelize sugar on top with the torch and serve!

Achy Neck and Shoulder Pain?

So are you ever in front of a computer?

Like most of us, you are probably sitting in front of a computer at least part of the day.  If not a computer, maybe a tablet or a phone (these are even worse since you probably aren’t in an ergonomically designed set  up for this).  If so, you probably have had some achy neck and shoulder pain in your time…

You know that achy bit of flesh between your neck and shoulders that you get people to rub?  That’s what most people mean when they come in to my clinic complaining of this so that is what a am going to talk about here.

Massage my neck please!

So that bit of muscle is made up of several muscles but the biggest one is called the Trapezius.  Usually, in my opinion, this isn’t the actual pain generator for this type of achy neck and shoulder pain.  I think in most people it’s another muscle called the levator scapula (but really who cares – it hurts so fix it …. right?)

If you have had this, I’m betting the first thing you did was rub it yourself, or get someone else to rub it for you. Right?

This makes sense because massage can help work out tired sore muscles and trigger points (aka knots).  These may have developed because of a period of overuse like sitting at the computer for a project for hours.

Been there right?

But it comes back…. so why?


Here is my perspective:

From my perspective as a chiropractor over use certainly plays a huge role, as does posture.  Staring at a computer or device for hours puts strain on our muscles AND joints.

At some point the muscles become overtired and can no longer protect the underlying joints.  The strain and stresses transfered to the joints begin an inflammatory cascade in the joint to add to that which is already going on in the muscle.

Inflammation bad.

It chemically irritates the joints and muscles further and then you get a decrease in range of motion of the joint and muscle as it is trying to protect itself further.  There is also inflammation in there.

Inflammation in the joint means there is more fluid in there.  This gets in the way of range of motion.  Think about surrounding your body in a thick snow suit and trying to bend your joints… same idea but inside the joint itself.

Ok so what can we do about it?

Again, my perspective as a chiropractor focuses on restoring normal range of motion to the joints.  When we do that the inflammatory response decreases and the pain dissipates…

We do that in my clinic in three ways

  1. Relax the muscle using muscle techniques
  2. Treat the fascia for adhesions (we will talk about that in a different blog)
  3. adjust the joint using various techniques

People respond to this type of treatment amazingly well – In fact in a poll in the USA recently conducted by Gallup 95% of past year users of chiropractic care said it is effective… that’s a pretty big number.  (97% of past year chiropractic patients said they were likely to see a chiropractor if they have neck or back pain – so I’m not sure what happened to the other two percent…)

Rice and Beet Salad

Ever thought of those two ingredients in a salad together?

Ya I haven’t thought of a rice and beet salad either…. but let me tell you it was one of my favorite recipes from my weekend away at the Women’s wellness retreat called Thirteen moons.

This post and the next bunch of recipes will come from Louise Racine and Her wonderful retreat http://www.thirteenmoons.ca because she says “sharing is caring”.

Love her.

Love this retreat.

Love her recipes (all vegetarian)

She has three cookbooks and you can find them on Amazon… in print or electronic media – so worth it!

Thank you for everything again Louise!

This pic was found on the internet – it is not Louise’s or my salad – as soon as I make this salad I will post my picture….

Ingredients

Here are the ingredients for the rice and beet salad in Louise’s very own hand copied from my email… it also includes the dressing which uses nutritional yeast flakes (very good for you and high and B vitamins) the dressing tastes amazing!

2 cups cooked rice blend (could also use cooked quinoa)
2 tbsp. chopped sundried tomatoes
1 raw beet, shredded or spiralized
4 cups arugula or other greens
Nutritional yeast Dressing
Goat feta
Fresh dill
 
Blend ½ cup dressing with rice, tomatoes, beets. Place on bed of greens. Sprinkle with feta and dill and pour a bit more of the dressing over greens.
 

 Dressing ingredients and directions

This dressing from Hollyhock (explained below) is a perfect match to the riche and beet salad and so many others that Louise makes at her retreat!  Try it – its amazing.

Hollyhock Yeast Dressing* (GF, V)
 
Hollyhock is a stunning retreat centre on Cortes Island in British Columbia, and this is their most popular salad dressing. This dark and intensely flavoured dressing is versatile and rich in B vitamins. It’s delicious on cooked grains as well as with fresh greens.
 
Yield: about 2½ cups (625 mL)
 
½ cup (125 mL) nutritional yeast flakes
⅓ cup (80 mL) water
⅓ cup (80 mL) soy sauce or tamari
⅓ cup (80 mL) apple-cider vinegar
2 tablespoons (30 mL) crushed garlic (optional)
1½ cups (250 mL) avocado oil
 
Put the yeast flakes, water, soy sauce, vinegar, and garlic in a food processor and blend until thoroughly mixed.
 
With the processor running on high, add the oil in a slow, steady stream. Add all the oil or stop when your desired consistency is reached. This dressing will keep in the refrigerator for up to 2 weeks.
 
Variation: I use wheat-free tamari and less oil either extra-virgin olive oil or avocado oil.
 
*Adapted from Hollyhock Cooks: Food to Nourish Body, Mind and Soul by Moreka Jolar and Linda Solomon, New Society Publishers, 2003, with permission from Hollyhock and Moreka Jolar.

Headaches – some of the different kinds

Did you know there are probably 100s of different headaches?

if you get picky about it there are likely 100s of different types, subtypes and such of headaches…

but if you break it down there are to major classes and several that fall in these classes.  I will briefly go over a few of the different common kinds of headaches in this post… maybe you can find your ‘favourite’ (or the flavour of headache you usually get)

Headache causes and symptoms

Two major classes

there are two major classes of headache really:  Chronic and Remitting

Chronic meaning that it is there with the person throbbing away or being its fun dull nastiness all of the time with no break. Not fun.

Remitting meaning that they come and go – this can be in all kinds of different frequencies…

Different kinds of headaches

Here is a short list of the most common headache types I see:

Tension Headache

Cervicogenic headache

Migraine Headache

Sinus Headache

Cluster Headache

Image result for tension headache

Tension headache

So these are probably the most common type of headache and can affect kids and adults and teens.  They come and go over type and can be accompanied with tight muscles in the neck and face.   These are often associated with poor posture, computer and device use.   I see lots of these with students too.  The pain location can vary between individuals . Length of headache and frequency and intensity also vary.

Chiro treatment can help these immensely!

Cervicogenic headache

These are very similar to tension type and affect the same group.  Pain areas often incorporate the back of the neck and head then spreads to other areas of the head.  On examination with a chiropractor it is determined that the joins of the neck or cervical spine are the likely culprit for these headaches with the pain being referred to the head from a disorder in the joints.

Guess what – this one is spine associated therefore chiropractic can help this tons too!

Migranes

These come in all shapes and sizes, some with aura, some with out – aura are symptoms other than pain that is associated with the migraine.  Oh don’t worry there is pain too, we will get to that…

An aura can come in the form of visual changes – flashing lights, narrowing of vision – I have even heard of some people who temporarily lose their sight all together.  You can have auditory changes (hearing), symptoms like numbness and tingling, nausea, gastrointestinal upset, if you can think of some sort of sensory change-  it can probably be an aura.   The aura usually precedes the pain of the migraine and so the migraine sufferer knows it is coming.  Not all migraines have auras though.

The pain of a migraine is usually described as intense, one sided (one side of the head) and unrelenting for a time.  Many sufferers report light sensitivity, sensitivity to sound and other stimuli. Often people say they need to go to sleep to relieve the migraine.

Regular chiropractic treatment has been shown to decrease the intensity and frequency of migraines.

Sinus headaches

Usually this is due to sinus infection, chronic sinus irritation or some sort of sinus inflammation or other irritation.  We have all experienced sinus pressure due to a bad cold or maybe even a sinus infection.  Here the pain is the result of referral from the sinuses to other parts of the head.

If you have these take a peek at this article I posted a while ago about how to encourage your sinuses to drain – I do this lots during cold and flu season with my patients and I teach them how to do it themselves… It can really help with the pressure of a sinus headache!

https://drkarenhudes.ca/index.php/2017/12/28/sinus-pain-pressure-releif/

So… are you noticing a theme here?  Chiropractic can help lot and lots of different kinds of headaches.  In fact I am a chiropractor today because a chiropractor once cured my headaches when I was in University. So, if you have a headache – give me a call – maybe I can help 🙂

Green Tomato Sauce

What exactly does one do with green tomatoes?

I tried making fried green tomatoes – I liked them and so did my husband (the 8 year old kid not so much) but really how many can you eat?  Once I tried making pickled tomatoes – this one was a big fail – maybe I didn’t get the brine right… this year I was asked by my husband “are you going to use the green tomatoes you froze last year?”? Quite possibly he wanted them out of the freezer…  so this year I tried making green tomato sauce – folks we have a winner.

I have this problem throwing out food – I really hate doing it.

I grow tomatoes every year.  Last year and the year before the frost hit before I pulled out the tomato plants and flash froze the tomatoes right on the vine. I guess I was leaving them there in hopes they would ripen.  No such luck.

So I threw the tomatoes in the freezer last fall and there they sat.

For almost a year… taking up space.

Right – so I wondered if I could make tomato sauce out of it – and gave it a shot – It was good!!!! so I made it and canned 4.5 or so jars and plan to do the same with whatever is left on the vine this year too… If we don’t eat it or we have too much I plan on giving it away as teacher gifts along with the jams I usually make in the fall.

Ingredients

Here is what you need for green tomato sauce

  • 5-10 lbs of fresh or frozen tomatoes
  • water
  • dried basil (1-2 tablespoons to taste)
  • dried garlic powder (1-2 tablespoons to taste)
  • Salt
  • Pepper

Really that’s it.

Super simple directions

Throw all tomatoes that will fit into the pot and add some water (1-2 cups will do).  Boil the hell out of them until they are a soft mush. You can take out the seeds if you wish but I left them in and didn’t even cut up the tomatoes before I threw them in.  I put mine in frozen….  unfortunately I left the green tops on mine before I froze them and had to pick them out after the boiling process- I suggest if you make this green tomato sauce that you take the green tops from the vine off before you toss the tomatoes in the pot.

Once soft and mush use immersion blender to smooth out or place in food processor or blender.  Add spices and stir.

At this point I started sterilizing my jars for canning (please look up how to do this properly so you don’t make yourself ill- it’s super easy just do it properly please).  At the same time I allowed the green tomato sauce to boil with the spices to combine the flavours.  When canning I added a bit of lemon juice to the top of my jars before sealing and re-boiling.


That’s it – green tomatoes out of my freezer and I have a start on the canning season (I’m a bit of a nerd and throw back to a prior century and like these things…)