Ever want to go on a Spa Tour?

Ok, I know that sounds super fun but I’m serious

I like doing novel things and generally have a list of experiences I want to try – I wrote about it in one of my first blog posts … Some of the fun, silly, scary and some people think crazy things I have done include doing the polar bear dip, playing Mas in Toronto’s Caribbean Festival and Parade last year, doing the CN tower Edge Walk, getting a pie in the face, pieing someone in the face, earthing and so many more…

Most of these things ended up on my “bucket list” and my patients, friends and acquaintances know I do this and are always asking what is next. This year I do wish to continue these things for sure and I have added: eating bugs (like crickets and silk worm pupae- a Chinese delicacy), trying new foods like Korean BBQ and Ethiopian, getting dunked in a dunk tank and then… I ran out of ideas. So I am always looking for more. (If you have some please email me!)

I came up with the idea of a spa tour when I was being silly with a friend at St. Anne’s spa last year – but the more I thought about it, the more I really liked the idea. Why not incorporate new experiences with spa and try to do something different every month or every other month?

Sounds good to me

So the Spa Tour began. This week actually!

One of my patients/collegues/friends suggested late last year that she wanted to try a Russian Bathhouse for the first time and asked if I would be interested (see people know I can’t pass up a new experience).

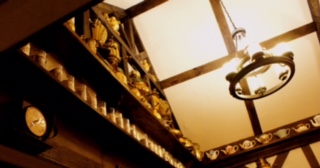
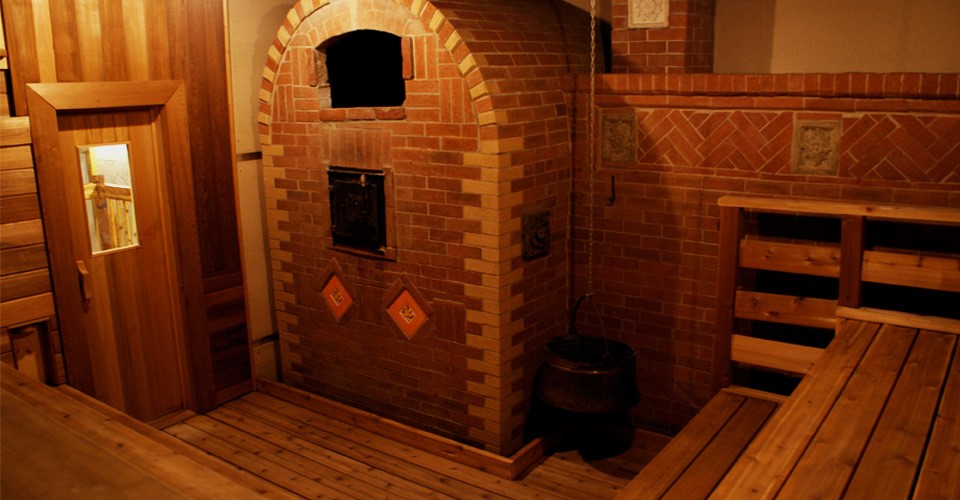
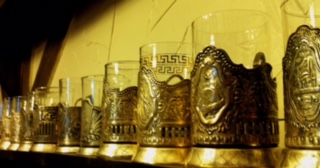
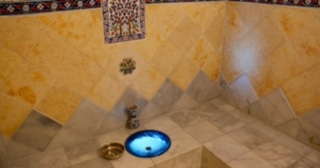
What is a Russian Bathhouse? Well there are several around the city but we chose Banya in Mississauga on the recommendation of my friend’s friend. It has a Dry and Wet Sauna, Steam room a cold plunge and cold bucket as well as a tea room that serves authentic Russian food (so yummy) you can find out more at http://banya.ca/

Tuesday is Ladies Night so I went with 3 friends and had dinner and a sauna from around 8 till 11 pm as well as tea.

Let me tell you the food was amazing (I had beef stew) and I was super relaxed – slept amazing and was so mellow the whole next day.

My friends and I decided that we would try another one – a Korean bathhouse next. Not sure when we will do this but the whole thing inspired me to try to do some spa and self care for myself monthly. This venture wasn’t overly expensive either – the spa entry fee was $45 and dinner was $15. Pretty reasonable I thought. The place is comfortable, clean, and kitschy I really liked it and recommend it – I would totally go back.

Yay! more Spa tour!

Below are some pictures from the Russian Spa Banya

What’s next?

Next on the agenda is a 2 hour foot and body massage at a wellness spa near my clinic – they have a special for $89 I believe – I will try to do this in February or early March and book the Korean spa with my friends after that.

Self care and relaxation is super important – what do you do to help yourself? Also if you have any suggestions for something to add to my spa tour list please let me know and I will review it!

Nutritional Yeast Salad Dressing

It’s still January – want to find a way to get more greens in your diet?

So did you make a resolution to eat more healthy this year? Now it’s the end of January …. so how are you doing with that promise to yourself? Do you still need to find a way to get more green things in your diet? I find that a great way for me is to make a salad I really actually like. Just thinking about it right now is making my mouth water. The key I find is in the dressing. So here is a recipe that is super easy for Nutritional Yeast Salad Dressing (um what? – ya just bear with me a moment here).

This is my favourite salad dressing – and I don’t really like salad dressings. I have posted this before in a prior blog post as a dressing for a Beet and Rice Salad (that is also to die for) you can find it here:

https://drkarenhudes.ca/index.php/2018/10/04/rice-and-beet-salad/

I think it is worth giving this Nutritional Yeast Salad Dressing it’s own post – for three reasons: It is just that good, I want to highlight it, and when I want to find it to make myself I wont have to remember that I posted it in the Beet and Rice Salad dressing recipe to find it. (Yep, this is all about me, and so? whats’ your point?)

So getting more green things in your diet Step One

  1. get more green things in your house
  2. eat them

Ok I am being a bit silly but for me this is how I did it: I bought a Tower Garden. Yes this was kind of pricey but I have to say I love it – A tower garden is a hydroponic garden that waters itself on a timer and has indoor grow lights so you can grow green things in the middle of the winter in your basement or home. Here is what mine looks like – I took this picture this morning:

Tower Garden

This thing grows greens that are so tasty and tender – best tasting salad I have ever had… if you want to order one you can here: https://kh18738.canada.juiceplus.com/

and then click on the tab that says tower garden at the top…

Now on to the recipe!

Ingredients

Here are the ingredients and directions for the Nutritional Yeast Salad Dressing – If you are still wondering what the heck nutritional yeast is – you can buy it in a bag at Whole Foods or health food stores and maybe Loblaws – it looks like this:

Image result for nutritional yeast

It is full of B vitamins and is super healthy and is a protein source for Vegans… also said to lower cholesterol, boost immunity and act as a good anti-oxidant.

This dressing was a recipe from Hollyhock which is a stunning retreat centre on Cortes Island in British Columbia, and this is their most popular salad dressing. This dark and intensely flavoured dressing is versatile and rich in B vitamins. It’s delicious on cooked grains as well as with fresh greens. Yield: about 2½ cups (625 mL) 

½ cup (125 mL) nutritional yeast flakes

⅓ cup (80 mL) water

⅓ cup (80 mL) soy sauce or tamari

⅓ cup (80 mL) apple-cider vinegar

2 tablespoons (30 mL) crushed garlic (optional)

1½ cups (250 mL) avocado oil 

Put the yeast flakes, water, soy sauce, vinegar, and garlic in a food processor and blend until thoroughly mixed. With the processor running on high, add the oil in a slow, steady stream. Add all the oil or stop when your desired consistency is reached. This dressing will keep in the refrigerator for up to 2 weeks. Variation: I use wheat-free tamari and less oil either extra-virgin olive oil or avocado oil. *Adapted from Hollyhock Cooks: Food to Nourish Body, Mind and Soul by Moreka Jolar and Linda Solomon, New Society Publishers, 2003, with permission from Hollyhock and Moreka Jolar.CATEGORIES

I also make half a batch and put it in a swing top bottle (read: old cleaned out beer bottle) for storage.

Happy salading!

Thai Red Curried Chicken for the Instant pot

Want a recipe that will become a staple?

This thai red curried chicken for the Instant Pot is it. I made it last night.

The “Before” (still in the pot)

I ate four bowls of it and drank the sauce. That’s how good it is. Have you ever had thai red curry at a restaurant? This recipe is restaurant quality. I am super excited by the whole thing because I LOVE Thai curries and I think this one will work with the green curry too . I also have a child who is very allergic to peanuts so Thai food is really not a great idea for him in a restaurant where a staple is peanuts… With this Thai red curry recipe I can make it at home and safely.

This recipe came to me from a patient of mine who gave me permission to share it and to credit her (Thanks Taylor L!) and the amazing part is that she MADE IT UP.

She is in her early 20s and I’ve known her since she was 9. Mindblowing recipe and I am so happy she gave me the go ahead to share!

Everybody please thank Taylor for this amazing yumminess!!

Ingredients

Here are the ingredients you will need for this Thai red curried chicken – while some are a bit odd they are all easy to find at your local Loblaws.

1 lb boneless skinless chicken thighs

3 tbsp red thai curry paste (Thai Kitchen)

1 can coconut milk

Sambal Oiek (hot sauce see pic) 1 Tbsp

Fish sauce 2 Tbsp

2 Tbsp brown sugar

1 Tbsp lime juice

Onion – one small chopped finely

4 lime leaves (see PC black label jar in picture below – can be found in herb section at Loblaws)

1 can bamboo shoots

small head broccoli and half head cauliflower broken into small florettes

two medium carrots and one orange or red pepper cut julienne, green beans (two handfuls) with ends removed

Ingredients that are “specialized” – all found by me at Loblaws

Directions

The instant pot makes this super easy and very tender and tasty though I think you could do it in a large pot on the stove or wok. Here are the directions for this Thai red curried chicken with the Instant Pot:

Place 1/2 a can of the coconut milk and half a jar of the Thai red curry paste in the instant pot and mix – Saute for 2 minutes.

Press Cancel

Add the rest of the coconut milk and whole chicken thighs and set to pressure cook on the highest setting for 4 minutes.

Do a quick release.

Here I took scissors and cut up the chicken into bite sized pieces without removing it from the pot.

Add the rest of the ingredients, stir and saute until the veggies are cooked to your desired amount of cooked-ness and you are done.

So easy, super fast. Really the hardest part was the chopping of veggies.

I served it with rice for my husband and cauliflower rice for myself to increase the keto-ness of the meal.

So good.

Lunch leftovers… so excited for lunch!

Just in case – here is the link to my prior curry recipe – the one where I describe how to make cauliflower rice: https://drkarenhudes.ca/index.php/2017/12/23/slow-cooker-coconut-curried-chicken-and-cauliflower-rice/

The “After”

Healthy Indian style Curried Chicken in the Instant Pot

Yes I have joined the Instant Pot cult

Ya, I have. Chicken cooked in 5 minutes. I mean seriously… who can say no to that? Ok, it isn’t a total of 5 minutes. The cook time is only 5 but it takes the pot to come to pressure about 10 minutes – still super fast. And there are a ton of recipes out there for it. This one is for curried chicken – I actually went looking for a thai style curry but I got an Indian style – which was super yummy (I ate three bowls of it) and also Keto/Paleo… I served it (to myself) with cauliflower rice and rice (for my husband who thinks cauliflower rice is gross – he is crazy but whatev).

Ingredients for Curried chicken

2 tbsp coconut oil

Two whole onions minced

2 sticks of cinnamon

10 cloves (whole)

around 2.5 lbs chicken breast cut in cubes

2 tsp crushed garlic

2 tsp ginger minced

1.5 tbsp curry powder (yellow)

1 tsp garam masala (avaliable at all Indian Grocery stores or on Amazon)

Whole can diced tomatoes and liquid

1 tin full fat coconut milk separated

salt to taste

Instructions for Curried Chicken

Put instant pot on Saute and melt and heat coconut oil then add onion, cinnamon, cloves and 2-3 tbs water and saute for 5 minutes. Add the rest of the ingredients (except the cream part of the coconut milk – reserve this for later) and stir. Cover pot and put valve on Sealing and then set on pressure cook on high for 5 minutes. Once complete allow it to vent naturally.

In the meantime prepare rice and or cauliflower rice.

Et Voila. Seriously that’s it… Super yummy.

In case you don’t have a recipe for cauliflower rice – here is one from a prior curried chicken recipe – this one is also awesome – a totally different taste..

.https://drkarenhudes.ca/index.php/2017/12/23/slow-cooker-coconut-curried-chicken-and-cauliflower-rice/

I hope you enjoy this one – let me know if you do… I know I will be adding it to my rotation 🙂

Goal Setting – How is it going this January?

Happy New Year!

Happy January! This is my first non-recipe blog post of the new year so I thought I would talk about something that is very January appropriate – goal setting.

I mean, lots of people right around this time of year may be falling off of the wagon they jumped on at new years … the death of the resolution so to speak – Generally starts to happen week two of January or a bit longer… I stopped making ‘resolutions’ a while ago. They have always been the same really (mostly starting with lose 20 lbs but whatever…).

Last year, I did something different. And I liked it.

So much that I did it again this year – weird!

It was goal setting. Wanna know the number one reasons goal setting doesn’t work? People don’t write down their goals. Seriously, that’s it. If you write them down you are some bigger than you would thing percentage closer to actually acheiving them. Of course you have to do the work but still, just writing them down gets you that much closer so what have you really got to lose?

In this post, I will share with you a super simple goal setting method I was shown last year in a fabulous group I belonged to so that you can be well on your way too.

Sound good? Ok lets go.

One tool for goal setting I recommend is a daily planner

Goal Setting tools

Ok so really all you need for this goal setting method is you and your honest self, a pen and a blank sheet of paper. But if you are really wanting to improve on what you accomplish off of your goal setting list this year I really recommend a daily planner. I really like this one pictured above- I had the same for 2018 and I got it recently at Indigo for $14 (it was on sale last week). More on the planner later.

Goal Setting How To

Here is all you do:

Get a blank sheet of paper and at the top write “5 Personal Goals”

Half way down write “5 Professional Goals”

Then be honest with yourself about what you want and don’t hesitate to reach a bit – even if you “don’t think it is possible to reach that goal in one year” if it occurs to you write it down. Be specific. Use numbers if it is appropirate (weight loss goals, income goals, exercise goals – use times per week etc…). The more specific you make it the better.

Once you have written 5 things in each category (it can be more if you wish) you are done the goal setting bit. Seriously that is it. Fold up the piece of paper and tape it into the front of your journal and don’t really look at it till next year.

That’s not really it though – things wont just come true if you write them down right?

so what is next?

Goal Setting Magic

So now that you have written down your goals. Here is where the planner come in to bring the magic.

Even though you aren’t looking at the goals you have written down every day or really at all till the next time you do this exercise, you know what they are in your head. So here is the magic part.

Every day do something (or several little things) that get you closer to that goal.

Here is an example of a fairly typical week from my planner last year and what this week looks like right now for me…

Last April some time
this week (note the top of the page where I put weekly goals too things I want to get done this week? Can’t wait to check off blog 1 “goal setting” when I finish this post…

I find that writing down what I do during the day regarding professional and personal goals helps me accomplish more.

Overnight success after a year of work…

What do you know you have to do to accomplish the things on your goal setting list? You know what they are….. Here is a tip – do the thing you hate most first. Eat the biggest frog first so to speak. Everything from there is downhill and easy.

For me at work that is “sales calls” – what does this mean for a chiropractor? No I am not cold calling looking for patients – what I do is call businesses or groups to offer to do free lunch and learns. I speak about a variety of health related topics like stress, diet, ergonomics, lifting technique and I even run guided meditation sessions. I love doing these workshops. BUT… I hate calling random places to find places to speak. Why? I have no idea – totally mental I guess. The places I call love it and everyone I have ever called has been super nice even if not interested… None the less, I don’t like making the calls.

So I try to set a number amount of calls to do daily when I need to start booking in advance. And I try to get these calls out of the way as early in the day as I can. I am not perfect at it but by having this in my head I do it far more often than I otherwise would. This got me to accomplish the goal I set last year of having at least one speaking engagement per week.

Goal Setting Fun

Last week, I got to open my goal sheet from 2018 when I sat down to write my new one for 2019.

I couldn’t remember exactly what was on it but somehow I accomplished 3/5 personal goals and 5/6 professional ones (yep, I did 6 – overachiever to the last).

So this year when I wrote my new goals I carried over one of the 2 I still wanted to accomplish from the personal goals (the other one I decided to drop as it no longer seems important or needed to me) and the 1 professional goal I was reaching toward but didn’t quite get to yet.

All good, I will keep striving for those, and I set 4 more new goals in each category.

I would love to hear about your goals – and what you think about all of this so please leave me a comment – I hope you find this helpful and fun!

Go get ’em this year. It’s gonna be great.

Home made Mac and Cheese

My Husband’s Flipping Awesome Mac and Cheese

Note hole in mac and cheese on left where I stuck in my fork for a couple mouthfuls right out of the oven…

So one day before Christmas my husband Ryan decided to make Home made Mac and Cheese. He didn’t have a recipe he just made it up in his head… and it was one of those that looked so good when it came out of the oven that I decided to take a fork right out of the drawer. I ate some and looked at him and I said “this is Flipping Awesome”. Except I used a different F word.

Generally in our house my husband is not the cook. Except with BBQ, chili, sandwiches, grilled cheese and omelettes. In these categories he reigns. But for him to decide to make something, without a recipe, is rare. F-word Awesome is rarer still so I asked if he could write down what he did so I could share it.

Usually I would write a healthy recipe

First week of January right? Usually I would include some uber-healthy recipe but this one does not fit that category… we can get to that next week … this home made mac and cheese was so good that I have to share it now because I don’t want to forget to do that. And selfishly I want a record.

Ingredients

Here are the things you will need for Home made Mac and Cheese

500 g Tortiglioni

1/4 c unsalted butter melted

500 g shredded marble cheese

1 c milk (we used skim)

1/8 c flour

5 pieces thinly sliced pre cooked bacon

One red pepper sliced julien

bread crumbs

paprika

club house tex mex seasoning

Directions

For the flipping good home made mac and cheese here is what you do: Cook pasta al dente or a bit under cooked. Melt butter and add milk – make a roux with the flour adding slowly and whisking. Heat and then add cheese (reserving some to top casserole dish with) till melted. Pour sauce over noodles, add bacon and mix and put in 9×11 casserole dish. Top with a bit more extra shredded cheese, bread crumbs to cover the top of dish and sprinkle with paprika, Tex Mex seasoning and arrange the red pepper slices on top. Bake at 375 F for 20 min.

Voila

Flipping awesome mac and cheese. Comfort food.