Disc Herniation and Low Back Pain

This week we will start a 10 part series on lower back pain.  There are so many causes of lower back pain we wont even try to cover them all here but I will mention the most common and give a few good exercises for most back problems in general for strengthening.  Today we will start with the number one most common back problem: disc herniation

Disc herniation and back pain

This is a super common cause of back pain and can range in severity from mild low back pain to excruciating pain with or without pain down one or both legs all the way to the foot. It can also cause tingling and numbness.  But, did you know a whole bunch of the population walks around with a disc bulge without knowing it at all?  On MRI 50% of people found to have this feel nothing.  So, what is this? Picture a jelly donut. Got it? This donut sits between 2 vertebrae and we call it the disc. Ok, sometimes the jelly in the middle of the donut works its way through the outside ‘dough’ and comes out or pushes the dough out in a spot – this lump or extruded jelly can put physical pressure on nerves or cause a ton of inflammation in the area which also puts pressure on nerves – your body interprets this as pain.

Disc Herniation illustration
Disc Herniations influence the nerves and cause pain

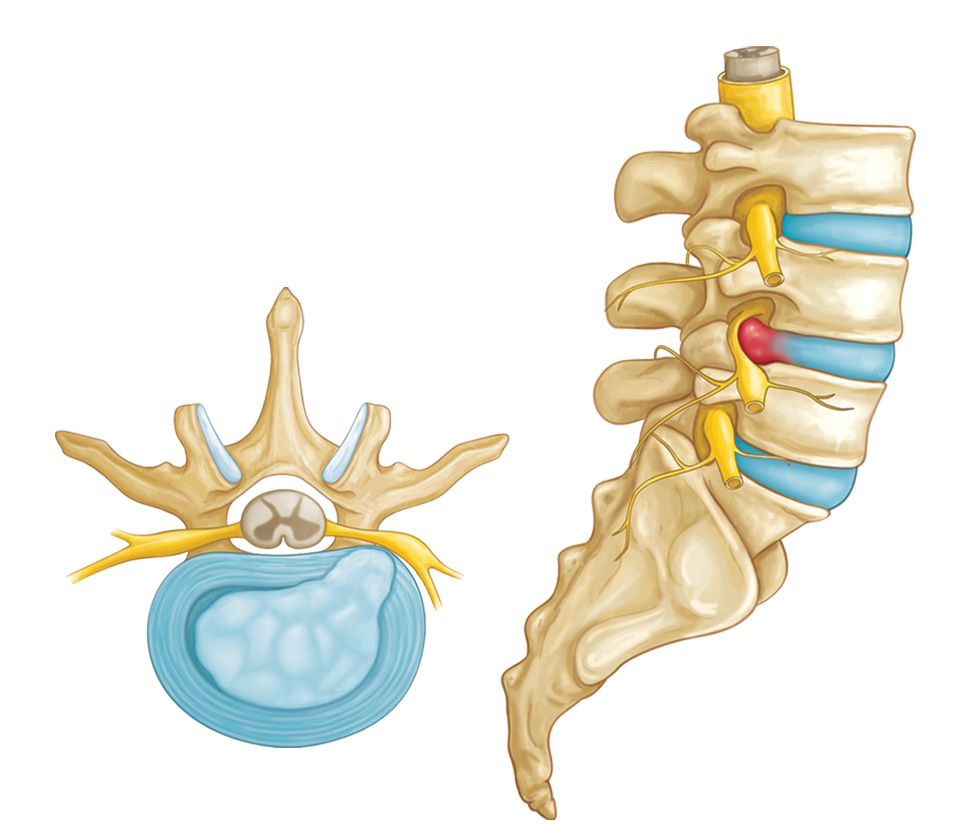
What to do about back pain from a herniated disc

First get checked by your chiropractor or other healthcare provider. It is important to have an accurate diagnosis to know what to do.  Remember that exercises I give are general ones and may not be right for you.  If you do have a herniated disc you will most definitely need hands on care to heal.

A great exercise for lower back pain

As a sweeping generalization though this extension exercise is great for most people and the first one I give to patients with a disc bulge or disc herniation.  All you do is stand up and put your hands on your lower back and then gently extend or arch your back then stand right back up.  Do this 5-6 times. It takes about 20 seconds.  For those with an acute problem I get then to do this once an hour.  Others I recommend a few times per day as it is protective and the opposite than all the flexion we usually do (sitting, bending, slouching).  See my YouTube video below for a visual demonstration.  If you try this and it increases you pain – STOP and ask your healthcare provider. Always listen to your body!

Ergonomics and Upper Back Pain

So while there is not usually one reason only for pain that comes on slowly, our repeated postures and actions play a large role in getting us there.  As I have said so many times you are probably sick of it, problems including upper back pain, are usually cumulative and build over time (unless you have an acute injury). Poor ergonomics and upper back pain are related to each other ; In fact ergonomics can be linked to all sorts of different body pain but here we will focus on upper back.

The way we sit at our computer desk for hours per day definitely plays a role in joint health. There are ways to make the impact less in almost all situations and help prevent things like upper back pain (and of course other pain).

Ergonomics and upper back pain tips and tricks

So, there are some easy quick tips for desk ergonomics that help the upper back. In this newsletter and blog post we will focus on the ones for upper back pain. Later will address lower back pain in another post when we talk more about the lower back.  So some quick points to check on your desk:

  • Monitor at or above (even better) eye level. This means if you have a laptop you need a monitor riser and a wired or wireless keyboard and mouse. Trust me the money invested in these is worth it.
  • Shoulders should be at rest and arms in the 90/90 position (meaning you should have a 90 degree bend at the elbow and shoulder at rest with little to no forward flexion)
  • Use the Posture medic 15 min every hour to help train upright posture – this may mean you need to raise your monitor even more as you get better! Don’t be afraid to do that!
  • If you have the ability and means get a sit/stand desk and change position every hour or two – remember cumulative trauma is the thing that causes problems so don’t let them accumulate so long!
an example of good desk ergonomics

(

Please share this newsletter with anyone you think it may be helpful for!  Here is the link to the blog post to make it easy to access: https://drkarenhudes.ca/index.php/2022/09/19/ergonomics-and-upper-back-pain/

Upper Back Strengthening

This week I will continue down the road of posture and give you my favorite upper back strengthening exercise to help with posture and losing the slouch of your upper back and shoulders. 

Strengthening the muscles that this exercise targets is important for upper back pain because they are generally muscles that tend to be weakened in people and cause poor posture. So since poor posture can be a cause of upper back pain in the first place, it is important to fix the underlying cause, or at least one of them. Remember though doing this exercise will help you best when combined with adjustments. If the joints are just not moving you are essentially running into a brick wall. The adjustment helps free up the mobility and then we need to retrain the muscles. Both parts are important, or we will just end up doing the same thing over and over again and not correcting the posture.

Ok so last week we talked about posture and why good posture is important. If you missed it please see the blog post here: https://drkarenhudes.ca/index.php/2022/09/07/upper-back-pain-and-posture/

Strengthening exercise for upper back pain

My favourite exercise for upper back strengthening is wall angels. You need a bit of empty wall space for this one.  Stand with the back of your heel and your butt touching the wall.  Put your arms up over your head in a ‘cactus’ position and make sure your upper arms, forearms, wrists and hands are touching the wall and stay flat against it the whole time.  This sounds simple but is the hardest part.  Now slowly draw your elbows down skimming the wall until they get as close to your waist as you can. Repeat this 5-10 times (start with 5).

This sounds easy but is really hard and most people let their hands and/or wrists come up off the wall at some point.  The goal is to keep them flat.  Try squeezing the muscles between your shoulder blades when you do this.

To see the YouTube video that I made for this exercise please click here

wall angels for upper back strengthening

Please share this newsletter with anyone you think it may be helpful for!  Here is the link to the blog post to make it easy to access: https://drkarenhudes.ca/index.php/2022/09/12/upper-back-strengthening/

Upper back pain and posture

Last week we talked about back packs – good (and bad) use of backpacks definitely play right into upper back pain and posture over time so if you missed it click here for the link to it. This week more on posture.

I get asked all the time about the relationship between poor posture and upper back pain.  There is a direct relationship for sure. Poor posture and slouching puts pressure on lots of different spinal structures.  I know I keep saying this, but damage is cumulative and builds over time.  Eventually one day you wake up in pain and aren’t sure why. Or maybe you do something small like lift a glass and “ouch!”. Well, the glass wasn’t too heavy it was just the last thing.  The thing that broke the camel’s back. Yes, you are the camel in this example. 

What to do about bad posture and upper back pain

Best thing to do is prevention.  So, we need to help correct posture before it turns into upper back pain or any other pain.  I get moms of teens in the office all the time worried about their teenager’s posture. And for good reason! If we can help correct bad habits before they become too ingrained, it is better for everyone. So, what do we do. For most people we start with a series of adjustments because if the joints are just not moving you could do all the stretching and yoga you would like but you are basically running up against a brick wall.  That brick wall is your joints and if they aren’t moving through their normal range of motion, you need an adjustment or a series of them to get them moving again. 

Ok I got adjusted – now what

For posture correction one of the tools I use is something called the posture medic. I sell this product at the office and it is a stretchy tube with padding that you put on like a backpack and it helps serve as a reminder not to slouch and put your shoulders back as we are helping correct your posture.  While it wont fix anything it will help break habits and build new ones if you use it!  I usually suggest people wear it for 15 minutes every hour they are sitting at their computer to start. That adds up to a lot in an 8-hour workday!

the posture medic tool for postural retraining

Please share this newsletter with anyone you think it may be helpful for!  Here is the link to the blog post to make it easy to access: https://drkarenhudes.ca/index.php/2022/09/07/upper-back-pain-and-posture/

Backpack safety

This is week three of our series about upper back pain and with back to school we will talk about backpack safety. But first here are the links to the previous two weeks blog incase you missed them:

week one Upper Back Pain
Week 2 Upper back pain

 This week since the kids in the GTA go back to school on Wednesday I thought I would talk about backpack safety.  Backpack safety is important for not only upper back pain but all back pain and joint health.  This is particularly important for our kiddos but as well for everyone who uses a backpack – I still do!  Damage to joints and the cause of pain and long-term problems are cumulative so everything you can do for your kids, and you help.  This includes regular adjustments and of course ergonomics and backpack safety – which is just really proper or best ergonomics to use while wearing a backpack.

backpack safety – choosing the right one for you or your child

Backpack safety tips

Ok so I am going to do this in point form because it is probably easier that way. Here are the tips I have for protecting yourself from upper back pain and all joint damage while wearing a backpack.

  • Choose a well-made backpack including wide straps and a padded back
  • Choose a lightweight backpack
  • Do not overpack – the weight of your pack should not be more than 10% of body weight
  • In order not to overpack take just what you need for the day
  • Keep the load as close to the back of the pack as possible (not in only the front pouches)
  • Wear both straps at the same time not just one
  • Use the waist strap if there is one to support some of the weight
  • Get in the habit of placing your pack on the table and turning around to put on both straps instead of slinging over your shoulder

Here is where you can get more information on backpack saftey

So those are our tips for this week – for more please see the links included below from the Ontario and Canadian Chiropractic associations regarding backpack safety!

Please share this newsletter with anyone you think it may be helpful for!  Here is the link to the blog post to make it easy to access: (ADD URL)

Good luck to all the kiddos going back to school and parents and educators too!

Upper back pain stretch

This week I will give you a great upper back pain stretch for pain and one for neck strengthening.  While I use these for people at the clinic with upper back pain due to rib problems I also use if for neck pain, and other causes of upper back pain.

Last week we started a series on Upper Back pain and talked about how to decrease pain between the shoulder blades (due to ribs not moving well).  If you missed it here is the link to the blog post: https://drkarenhudes.ca/index.php/2022/08/18/upper-back-pain/

Upper back pain stretch 1

So, the first one is a true stretch, and it is called the levator scapulae stretch.  Really you want to do all stretches on both sides, but we are going to talk about this for the side of pain ok?  I will talk you through this stretch for upper back pain and below is a link to a YouTube video I made so you can follow along more easily.

Let’s pick the left side as the side of upper back pain for this example.  First drop your chin to your chest. Now rotate your head to your right armpit so your nose is pointing in that direction.  Now place your right hand over the top of your head and gently pull down. You should feel a stretch along the back left side of the neck and maybe all the way to your shoulder blade if you are doing this right.  Next take your left hand and grab the back of the seat of your chair if you want a bigger stretch. Hold for at least 20-30 seconds or longer

For the link to the YouTube video for this stretch click here

Stretch 2

For this upper back pain stretch one I am lying just a bit. It is more of a strengthening exercise, but I feel a stretch at the back of my neck, probably because I am super tight and need it. This is a doubly good one for upper back pain because it is relieving and strengthening. This one is called resisted retractions.  I do this in the car. DON’T DO IT WHEN DRIVING! I do this at a red light. Make a double chin.  Push your head back into the headrest (think of the action a pigeon does).  Hold for 10-20 seconds or longer as you get better at it

For the link to this video click here

Ok that’s it for this week.  Next week in honour of school starting (yes I know, shhhh!!!! Sorry!!!) we will talk about backpack safety and ergonomics for the kiddos (and any of us overage kiddos like me who still use backpacks sometimes).

Please share this newsletter with anyone you think it may be helpful for!  Here is the link to the blog post to make it easy to access: (add recipe?)add kubj

Upper Back Pain

Upper back pain part 1

Ever have pain in the upper back, near your shoulder blades, in your lower neck or traps (sometimes patients call this their shoulders), your neck or have headaches?  If you have then read this newsletter and blog – if not read it anyways you or someone you know may need it.  I’ll keep it short and sweet.

Every week for the next 5-6 weeks our newsletter Quick Tip Tuesday will have a short tip on upper back pain. I will be posting these on our blog each week too so you will continue to have access to it. Each week we will have a bit of a different focus and one or two quick things you can do to help yourself with upper back pain.  Then each month or so a new topic will start and we will do the whole thing over again!  So please feel free to share this newsletter and the blog posts with friends and family who you think it could help!

Pain relief for upper back pain

This week we will focus on pain relief for upper back pain.  I will tell you that a lot of upper back pain that I treat is caused by the ribs.   So, a lot of my patients have never thought of their ribs except the ones that sort of stick out near the upper part of their belly.  But the ribs form a cage around the lungs and heart. The ribs are supposed to move up and down very slightly like a bucket handle with every breath but sometimes they stop moving correctly.  But why?   Life, lifting, sitting, ergonomics, injury, the list is endless and there is rarely one reason this happens. The truth is that problems are cumulative and getting adjusted regularly really helps avoid things like this kind of upper back pain.

picture of rib cage - often upper back pain happens right between the shoulder blades

Too late and you already have pain?

Don’t fret, if you have pain already, I am going to give you a quick tip to help yourself right now if this rib problem is the issue.  Of course, you should come in and get checked out to be sure this is the issue so please book an appointment so we can make sure you are doing all the right things to heal. In the meantime, try the towel trick or using a ball like a lacrosse ball on that spot between the spine and the shoulder blade and lay on it with your arms outstretched in a T formation for about 5 minutes.  This should help ease the pain for a time.  Also please ice it for about 10 minutes. Please see the youtube videos below that I created for these two tips!

Towel trick exercise

For a link to the towel trick exercise for upper back pain click here

lacrosse ball trick

for a link to the lacrosse ball trick for upper back pain click here

While this is not going to fix all of your upper back pain it will be a pain decreasing measure you can take right now at home until you can come in to see me.  A few adjustments may be needed to get that rib moving again, calm down the inflammation and let the muscles relax. We’ve got this!

Next week once you are out of acute upper back pain we will talk a bit more abour things you can do to help stretch those muscles!

Zucchini Soup

It is officially fall. Dark and all. One of my fave things in fall is soup. I love soup! Apparently I love it so much that I talk about it with my patients and that is how I was given this recipe for zucchini soup. Thank you Bob! (ok really thank you to Bob’s wife). THis one is so simple and so amazing I know I am going to make it all winter – oh yeah and grow more zuccini next summer too.

pot of zuccini soup

Ingredients

4 medium zuccini

1 sweet onion (I use the green part of green onions only to make this FODMAP friendly)

4 cups veggie or chicken broth

1 clove garlic (optional)

salt and pepper to taste

Super simple directions for Zucchini Soup

Cut up onions or green portions of onions and saute in bottom of pot in a little oil or butter until fragrant. Add garlic if using and saute 30 seconds. Add broth and then chop up zucchini coarsly into rounds. Heat on high until boiling then turn down to a simmer until zucchini is soft about 20-30 mintues. Blend in batches until smooth or use immersion blender. Add salt and pepper to taste and add water if it is too thick. Serve with dollop of sour cream and chives as garnish.

This soup is so darn easy and way tastier that I would have given zucchini credit for. In case you were wondering what a FODMAP food was check out this link. I cut out onions because they tend to make me gassy… instead I substitue the green part of green onions or leeks for the flavour and it works beautifully. Let me know if you tried this recipe!

Yummy zucchini soup with sour cream!

Gnocchi in Gorgonzola and Garlic Cream Sauce

This one comes with story…. don’t they all? Once upon a time, an old childhood friend got married and lived in Ottawa and I went to visit. Her husband made this dish and it was so good I remember it now and again more than 20 years (maybe closing in on 25 years) later. It seemed so fancy at the time and today I saw gnocchi at the supermarket and remembered it, bought some, and made it this morning for my dinner on my night to work. Looked too good. Ate it for lunch instead. I thereby give you: Gnocchi in Gorgonzola and Garlic Cream Sauce!

Epilogue: friend got divorced many many years ago after a short marriage and the recipe to this dish was sadly lost in the divorce.

Happy Ending Post Script: Friend got remarried to her childhood sweetheart/love of her life and is living happily now for years and years with him with a son the same age as Leo (my son).

Even Happier Ending: I remembered this dish and invented my own Gnocchi in Gorgonzloa and Garlic Cream Sauce recipe and am sharing with you and the whole internet!

gnocchi in gorgonzola and garlic cream sauce
serious yum factor

Enough Silliness, here are the ingredients for Gnocchi in Gorgonzola and Garlic Cream sauce.

1 package pre made gnocchi (or make your own if you know how… I, sadly, do not)

1 cup skim milk (or whatever fat content you like)

garlic scapes (5) cut into very small pieces (I happen to have these from my garden) OR 2-4 cloves of garlic

80 g (or so) Gorgonzola ( I used cambozola because that was all I could find and I figured it was similar though had never heard of it before)

3-5 tsp butter

salt to taste

around 1/4 cup of flour

Directions

Gnocchi in gorgonzola and garlic cream sauce sounds and tastes like restaurant quality. In reality it is super simple and takes about 15 minutes. I am serious. Especially if you use the premade, boil it up, gnocchi. If you are feeling industrious and want to make your own here is a link for a recipe I found for homemade gnocchi. Honestly I like the ones in the package…

Ok, so get the gnocchi boiling and follow the package direction – please use salted water – they taste better this way. Drain. and rinse. While doing this, melt the butter over medium heat and sauté garlic or garlic scapes until fragrant (around 1-2 mins). Add flour and mix with a fork or whisk until a paste forms. Pour in milk, around a quarter cup, at a time mixing all the while with the whisk so that lumps do not form. Dump in gorgonzola in chunks and allow to melt while whisking and add salt to taste. You may need to add a bit more milk if it thickens up too much. Serve over hot gnocchi. Seriously this one is so good I have to do it again.

Veggie Rice Wraps

Have you been cooking and eating your way through Covid? Ya, me too. I thought it was time to use my evil talents for good and start cooking and eating well. After all there is a light at the end of this long dark tunnel that is getting brighter, and who knows, maybe bathing suit season with other people there will actually happen. With that in mind, I tried a really easy lunch recipe recommended by a friend – veggie rice wraps. So healthy and so yummy! Oh ya, easy too.

Veggie Rice Wraps
Veggie Wraps – healthy, easy, delicious and beautiful too!

These also turned out so pretty – they say you eat with your eyes so that doesn’t hurt!

Ingredients for Veggie Rice Wrap

rice papers (two for one lunch)

baby spinach

red, yellow or orange pepper julienned

carrot – around 1/4 large peeled and using the peeler peel the carrot into shreds

left over fish, chicken or other protien cut into small chunks

rice or quinoa

hot sauce or other flavouring

Directions

Soak rice wraps in cool water for 5 minutes to soften. Place on plate and add handfuls of each ingredient onto wrap like you would a burrito and top with sauce or flavouring or mayo. Tuck ends in like a burrito and wrap as tight as you can without tearing rice paper. It will stick to itself – repeat with second wrap and enjoy! You can also have dipping sauces if you like. I think I will try this with some left over butter chicken I made this week and veggies today ….ooo that’s gonna be good. Get creative with these veggie rice wraps and let me know what you come up with!