Stretching your Hips for Low Back Pain

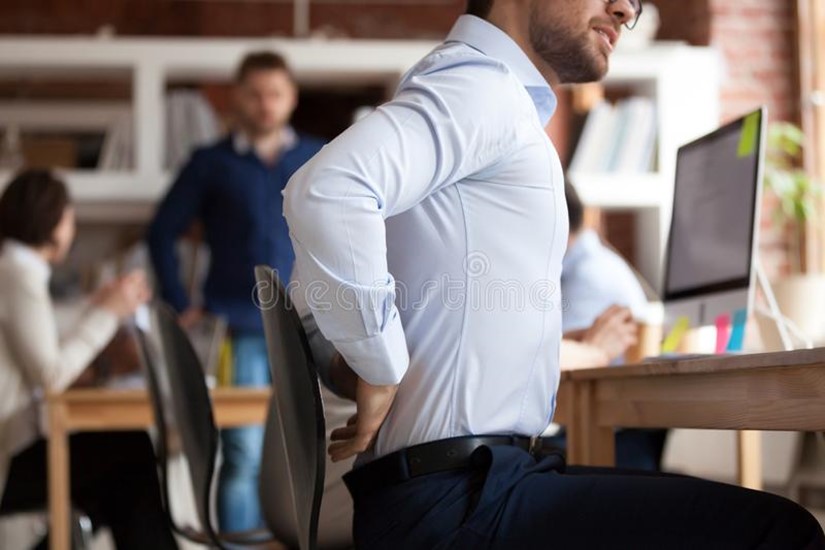
Here is a great post written by Dr. Rebecca about lower back pain and how and why stretching your hips for low back pain is important!

Last time we discussed how sitting can cause tight hips and your low back pain, also known as lower crossed syndrome. You can find that article here

Stretching your hips is a great way to address hip tightness and low back pain. In these videos we are targeting two of the major muscles that can cause tight hips: rectus femoris and psoas.

Here are some common questions when it comes to stretching:

1. Should stretching be painful? No! Focus on going to the point of tension when you just start to feel the stretch. Holding the stretch with this amount of tension will teach the muscle to relax. When you overstretch to the point of pain, the muscle doesn’t relax, defeating the purpose of what we’re trying to do.  

2. How long should I hold the stretch? A general rule of thumb is holding the stretch for 30 seconds! It’s not uncommon to feel the tension decrease as you hold a stretch, usually around the 15-20 second mark. At this point you can move a little deeper into the stretch, again just to the point of tension.

3. How often should I stretch? As often as you like! Stretching is a good self-treatment when you’re having pain but it works even better as a preventative measure. If you commonly experience episodes of low back pain, regularly stretching your hips could help prevent the low back pain from developing.

A few reminders about stretching

  • Go very slow
  • Do not do it if you’re injured
  • Stop if you experience pain
  • Support yourself if you feel off balance – either with a wall or a stable surface

If you’re in doubt or wondering if these stretches would be appropriate for you, please don’t hesitate to contact BAC Wellness or schedule an appointment. These exercises are a great ways for you to take care of your body at home but don’t take the place of the care provided by a medically licensed professional with expertise in diagnosing, examining or treating medical conditions of any kind, or in determining the effect of any specific exercise on a medical condition.

Disclaimer: The painting’s not crooked – I promise! Spent many minutes adjusting it before I realized it was the camera angle

Video links for stretching exercises:

Hip Flexor stretch 1

Hip flexor stretch 2

Pineapple Upside-down Cake

I have never made any kind of upside-down cake, nevermind pineapple upside-down cake. While I have heard of it before it is kind of an older idea I associate with the 1970s or 80s. Well what is old is new again. I gave this one a shot and WOW. So good. Simple and pretty and amazingly tasty. You can use fresh or canned fruit and it can really be any fruit you like though I think watery things like raspberries would go mushy so be careful. Pineapple, pear, peaches would all work well!

I got this recipe from a patient, thanks Susan O.! Susan had told me that she had made it from an older cook book she had and it was so good. So here is the modified recipe for upside down cake from an old Ontario cookbook called Food that Really Schmecks by Edna Staebler. Btw this also appealed to me because the word shmecks is German for tasty or yummy and my family grew up using it because of the German heritage on my moms side. And it didn’t disappoint – schmeckt gut for sure.

pineapple upside-down cake
pineapple upside down cake – I mean look at that! Gorgeous!

Ingredients for Pineapple Upside-Down Cake

topping:

1/3 cup of butter

3/4 cup brown sugar

slices of fresh or canned fruit to cover bottom of cake pan: pineapple, peaches, apples, pears all work well. Edna suggests large pitted prunes (ummmm not sure), peach or apricot halves, apple slices, or blueberries – even raspberries but they would be softer.

Cake:

1/2 cup butter (unsalted)

1 1/2 cups of white sugar

2 eggs

2 1/4 cups of all purpose or cake flour

1/2 teaspoon of salt

2 teaspoons of baking powder

1 cup of milk (I used skim but any is fine)

1 teaspoon vanilla

Directions for Upside-Down Cake

Pre-heat oven to 350F. I used a round silicone baking pan – this made it super easy to flip out with no stick but if you don’t have one make sure you grease the cake pan especially the sides. Also important to note if you just want a moist white cake with no topping you can skip the topping part.

Ok for the upside-down part of the upside-down cake start by melting the butter for the topping and mixing in the brown sugar and pour into cake pan and arrange slices of fruit on top of it in a pattern – make it pretty or not whatever floats your boat. You can also toss in some nuts be we are nut allergic around here so that one is a no-go. Ok now set the pan aside.

In a separate bowl add melted butter for the batter and add sugar and mix. Add the beaten eggs and use a mixer to beat until fluffy (you can also do this with softened butter instead of melted but I tend to forget to take out the butter earlier and then am either in a rush or kinda lazy – worked well with melted butter too so whatever!). Now you are supposed to sift the flour, salt and baking powder together (which I never do – again, lazy, so I just mix together) and add in alternating bits with milk and vanilla and beat well after adding a bit of each until it is all mixed in.

Finishing touches

Now dump the batter, which will be thick, on top of the fruit and topping mix and spread carefully so as not to disturb the fruit. Bake at 350F for around 45 mins. Make sure you have a platter or cake plate big enough nearby – when you take this out of the oven and it is still hot (but cooled a few mins) place cake plate upside-down on top of the cake and flip out of the pan. You can serve cool but also amazing while still warm with ice cream … honestly this one was a huge hit at home – give it a try!

Snow and Back Pain

Is snow causing aches in your shoulders, back and everywhere in between?

Dr. Karen and I were chatting just the other day about how the clinic always seems to be a bit busier after winter storms. And there’s usually a common culprit: snow shoveling!

Considering January is just getting started, we wanted to provide you with a few tricks to help manage any stiffness or pain you might experience while shoveling snow. Check out the videos to see good and bad lifting techniques in action!

  • Warm up your muscles! The easiest change can make the biggest difference – take a few minutes to move around or do some jumping jacks to get your muscles warmed up before you start.
  • Push, don’t lift! Pushing snow is a lot easier than any lifting so try to push whenever you can.
  • Lift light to lift right! I don’t know about you, but I’m not training to become a professional snow shoveler! Pushing and lifting smaller amounts of snow is easier on your body.
  • Pick a good shovel! Using a lightweight, push-style shovel puts less strain on your body. You may also consider using a smaller blade: these are usually lighter in weight and the smaller blade will force you to lift less snow.
  • Use a wide grip when lifting! This decreases the strain on your body.
  • Lift with your legs! Try to squat down and bend your knees when you have to lift, driving through your feet to stand. This decreases the strain on your low back.
  • Shove, don’t throw! Instead of twisting through your low back, push the handle through your hands to unload the snow.
  • Watch out for any ice! Using salt and sand can help to limit any nasty slips or falls.

Hopefully these tips can help you stay up and moving through the winter months. But if you start feeling discomfort or stiffness, we’re here to help you get back to moving with ease!

Video Demonstrations!

Shoveling Don’ts
Shoveling DO’s!

Lower Crossed Syndrome

 The body is amazing in that everything’s connected. Unfortunately that means when the muscles in your hips tighten up it can lead to low back pain. This compensation is so common it has its own name: Lower Crossed Syndrome.

lower crossed 2

Imagine an “X” across the hip (or just look at the image!). One line connects the low back and the front of the hip (the “tight” line) and another connects the front of the abdomen to the glutes (the “weak” line).

The hip flexors, the muscles at the front of our leg responsible for hip flexion, can tighten and tilt our pelvis forward. This forces our low back to arch and the muscles in our low back tighten to keep our body upright. This becomes a problem when our hip flexors and low back muscles are constantly active and tight.

This leads to compensations in our abdomen/core muscles as well as glute muscles. These muscles become “weak” or underactive. It’s not necessarily that the abdominal and glute muscles aren’t strong (we see you doing those squats and crunches!) but they’re not “turning on” to help keep us upright.

To fix the problem you have to address both the “tight” and “weak” lines – loosening “tight” muscles and retraining “weak” muscles – and chiropractic can help with both! One of the major causes of tight hip flexors is sitting. So taking breaks every 20 minutes and moving around can help prevent this from becoming a problem. And of course stretching out those hip flexors will help – stay tuned to our Facebook and Instagram pages this week to see how you can stretch out your hip flexors!

Krapfen and Sufganiyot – aka Special Donuts

Once upon a time in my fairytale childhood my Omi (grandmother) used to bake and cook for my extended family of 13 quite often. I saw my cousins all the time and it was really special. One of the things she used to make for us was a whole pile of Krapfen (donuts). These were so special and amazing that one of my cousins thought about opening a chain of donut stores that he would call “Grandma’s sweet buns”. Didn’t happen but those times live in all of our memories and though times are different (especially this year) we can still share the memories – and I like to do that through special food. I made these this year for Hannukah and turned this recipe into Sufganiyot.

Ok, this is funny (my dad would be laughing) for a couple reasons. I come from a mixed background. Omi – from whom this recipe comes, was from Transylvania and was not Jewish. But the other side of my family on my Dad’s side is Jewish. Proving that we are all more alike than different, I discovered sufganiyot (which I did not grow up with) is a treat for Hanukkah from Israel. Upon inspection, the base for them is actually exactly the same as Omi’s Krapfen. Eastern European cooking and recipes being much the same across different countries and cultures. This made me extremely happy and this year I made krapfen and sufganiyot for my son Leo.

krapfen
Krapfen
Sufganyiot

Ingredients for krapfen and sufganiyot

5 cups flour

salt

2 pkg vanilla sugra

2 handfuls of sugar

1 package of yeast in 1/2 cup warm water and a spoon of sugar

1.5 -2 cups warm milk

2 egg yolk

1 spoon rum

6 spoons melted butter

Ok so you will notice the “measurements” on here are old school grandma type. Do your best. A spoon in my grandmother’s kitchen meant a large soup spoon. More than a teaspoon probably less than a full measured tablespoon. Godspeed. (but it did work for me – then again I did bake with her in her kitchen on occasion)

Directions

Ya, my grandma’s recipe came with none but I found this on Martha Stewart – so I used this as a how to guide.

Basically – combine dry ingredients and make a well, mix in all wet ingredients then turn out onto floured surface and knead around 10 minutes. Set aside in greased bowl with towel or plastic wrap overtop for around 1.5 -2 hours (it should double). Turn out and roll on floured surface to around 1/2 ” thick and cut out circles using a drinking glass (2″ or bigger ). Allow these to rise again to around double. Fry in oil till golden on either side and set on paper towel to absorb oil. When cool enough use a flavour injector to inject in strawberry jelly (or any other) and top with powdered sugar for serving.
Tip- only put jelly in and sugar on when ready to eat or they will go soggy. Next day warm up in toaster oven first and then fill.

Oma Potatoes by Dr. Rebecca

This is Dr. Rebecca’s first contribution to our recipe blog! Yay! This recipe was named after her Oma (or Grandmother) which is super exciting for me because I had an Omi – Dr. Rebecca and I need to talk heritage! We hope you love her Oma Potatoes and thank you for sharing the recipe Dr. Rebecca! Thinking of you Oma!

Oma Potatoes!

I can’t think of anything that brings people together better than food. And in a time where many of us can’t gather with all our loved ones, why not keep the memories alive with a family recipe?

This recipe is what our family fondly calls “Oma Potatoes”. They’re named after my Oma who used to make this for our family Christmas every year. It’s nothing too crazy what makes it so special is the memories associated with it.  It actually wasn’t until my Oma passed that I found out it was originally my mother’s recipe that she had adopted for our family use.

This recipe smells absolutely heavenly and is loaded up with potatoes, butter, cheese, cottage cheese and sour cream. Sorry daily allergists – but it is gluten free! And bonus, if your oven is full of turkey (or just broken like mine is currently) you can bake it in a roaster!

Ingredients for Oma Potatoes

8 potatoes, cooked and mashed

1 cup cottage cheese

½ cup sour cream

Salt and pepper

¼ cup grated cheese (or as much as you desire! We use cheddar or marble but any kind works)

2 tbsp. butter

Directions

Here is the how to on Oma Potatoes:

Add cheese, sour cream and butter to potatoes. Mix until smooth. Spread in a 9×13 baking pan and sprinkle with grated cheese and melted butter. Cover and refrigerate for 24 hours (optional). Bake, uncovered, at 350° for 30-40 minutes. Great for a meal planned for next day.

Why not give an old family favourite a try? Or you’re welcome to try “Oma Potatoes” or any new recipe and make a new favourite!

Dr. Rebecca

Bourekas by Vera

I love bourekas. If you don’t know what they are and you know Greek food think spanikopita (with or without spinach) and a bit of a different pastry. Anyway its a pastry filled with cheese and it is delicious. You can find these in Jewish or Mediterranean Bakeries and many Bagel shops here in Toronto.

This recipe came to be from a wonderful patient named Vera Gutmanovitcz. She gave me permission to share her name – actually she said she is “happy and proud to be my patient” so I was welcome to identify her. Just typing that made me tear up a bit. I love you guys. Anyway, this is her yummy yummy recipe and it is really easy – she uses the frozen pre made puff pastry you can buy at any grocery store but you can also make your own (I didn’t). This version of bourekas was so tasty and easy my husband Ryan asked where they all were this morning. Gone, babe, they are gone… I will make more this weekend.

bourekas

Ingredients for Bourekas

2 sheets of puff pastry

1/2 cup crumbled feta cheese and 1/3 cup grated kashkaval cheese – or substitue another 1/3 cup feta cheese)

1/3 cup ricotta chese

1 large egg

salt and pepper

egg yolk – one – reserved for brushing on top of pastry prior to baking and sesame or poppy seeds for topping.

non stick oil spray

Directions

Preheat oven to 350 degrees F. In a mixing bowl combine cheeses and egg and a pinch of salt and pepper (if using feta you can skip the salt). Use a fork to blend and break up any feta and set aside. On a floured surface unfold puff pastry and roll to 12×12 square. Cut into 9 equal sized squares about 4×4 “each.

Place one tablespoon cheese filling in centre of each square and fold into triangle using fork to crimp together (if it doesn’t stay try wetting your finger and run along edges of dough to help it stick. Place on sprayed cookie trays or line with parchment. In a small bowl mix yolk and 2 tsp cool water and use pastry brush to brush layer of egg wash on each boureka. sprinkle sesame seeds on top and bake 30 mins. Switch trays on racks half way through baking. Bake until golden.

These can be frozen prior to baking too. Prepare and fill and do not coat with egg. Freeze in layers in tupperware or on cookie sheet and store separated by wax or parchment paper. When ready to bakd take them out of freezer coat with thin layer of egg wash and sesame seeds and bake frozen at 350 F for 30-40 mins until golden.

Hope you loved these bourekas as much as I did! Thank you Vera!

Mom’s Chicken Paprikash

Growing up this one was a staple from my Mom’s kitchen. Modified from the old country using readily available ingredients in the 1980s it makes this classic super easy and very tasty. I had totally forgotten about it until my sister asked for the recipe (I am the Keeper of the Cookbooks) and so I found them for her and was inspired to make Chicken Paprikash. Try it, you’ll like it.

Chicken Paprikash

Ingredients for Chicken Paprikash

2.5 lb chicken breasts or skinless legs

1 can tomato soup

bay leaf

1 can sliced mushrooms drained

2 Tbsp shortening

paprika – 2 tsp

1/2 cup sour cream full fat

cooked noodles or spatzle (German noodles) or you can make and serve over flour dumplings

Instructions

So this is pretty darn easy. Brown the chicken in shortening and pour off fat (yes, I know but this is an 80s recipe adapted from the old school old country recipe – don’t use it if you don’t want to but it does taste better. Anyway just brown the chicken). Add remaining ingredients except noodles. Cover and cook over low heat for 45 minutes or until tender. Remove bay leaf and serve with noodles. Serves 4-6.

So good. A taste home and reminder of Mom and my Omi (Grandmother). I served over spatzle – traditionally over flour dumplings but I have lost that recipe – the one above is the closest I can find (spoon dumplings in link) I will have to give it a try. Hope you love Chicken Paprikash as much as I do.

Falafel Salad

Ok so this weekend I had a golf lesson at the cottage with some friends, the dudes golfed and met us for drinks and lunch on the patio. My friends (the girls at least) were all raving about this salad they had tried before… It was so good I copied it. I have to say I got it bang on too. Made my own falafel but did it in the air fryer – which was super easy and tasty and healthy. Give this falafel salad a try – you won’t be disappointed.

falafel salad
drool worthy falafel salad

Falafel recipe

For the falafel part of this falafel salad I used this air fryer falafel recipe from Skinnytaste – if you haven’t seen recipes on Skinny taste check it out they are all really good. The only difference mine had was a higher and longer cook time on the air fryer to get a crispy golden outside (400F for 9 min each side). Oh and I did more or less puree it. I like a not too chunky falafel – personal preference.

The basic ingredients you need for this are canned chick peas, cilantro, onion, green onion, parsley and garlic, baking powder and flour. Oh and cooking spray for the air fryer. A bit time consuming but easy. You can also buy pre-made falafel and put it in the air fryer.

Dressing recipe

So this falafel salad had a sun dried tomato dressing. I googled sun dried tomato dressing and got one that popped up and I made some modifications- here it is:

7 pieces of sundried tomato packed in oil

6 tablespoons olive oil (I used 4 plain and 2 spiced with tuscan herbs – next time will use some of the oil from the tomato jar instead of tuscan herb oil)

1 clove of garlic

4 teaspoons apple cider vinegar

1/4 tsp salt

a bit of ground pepper

a spash of lemon juice

Throw all of this into a blender or food processor and puree. I stuck it in a squeeze bottle to store in the fridge.

Falafel Salad Recipe – “the goods”

Ok so you got your falafel (still hot) from the air fryer, and you got your dressing in a squeeze bottle… here we go

Ingredients:

Spinach

thinly sliced red onion

feta cheese cubed

4-5 hot falafel

dressing

avocado (optional)

pumpkin seeds (optional)

On a bed of baby spinach throw a few slices of red onion, feta, avocado and the warm falafel and top with dressing. Mix and enjoy.

This was so good, and I nailed it so well that when I sent pictures to my friends these were their comments:

“Karen!”

“Looks delicous”

and

“So envious!! I am drooling just looking at the picture”

Now I have to publish this so I can send them the link… you know who y’all are 😉

Fresh Strawberry Pie

It’s strawberry season! That usually means that I, like my mother before me, go a bit overboard when I pick strawberries. Last week I went out with my son Leo and we picked about 10.5 L (!) So after washing, hulling and making jam I still had a ton! I have had this recipe for strawberry pie for years but totally forgot about it! I have since made strawberry pie twice. It really is amazing.

Fresh Strawberry Pie
Yes, it is as good as it looks… better

Strawberry pie ingredients

so here are the ingredients for the strawberry pie. If you want to make your own pastry please see below for a “perfect pastry” recipe for two pie crusts. Otherwise you can use prepared bought pie shells – just be sure to follow the directions on the box and bake it.

one baked pie shell

2 quarts whole strawberries washed and hulled

1 tablespoon lemon juice

one cup sugar

2.5 tablespoons of cornstarch

Directions

Put half of berries into the pie shell whole (please make sure the berries are dry). Put the other half of the berries in a saucepan and crush with a potato masher. Add sugar and cornstarch and boil and stir until clear and thick. Add lemon juice. Let this mixture cool a little then pour over berries. Let stand in refrigerator for 2 hours and serve with whipped cream.

strawberry pie part 1
using a deep pie pan helps…
strawberry pie part 2
mixing glaze for pie

Seriously this is so simple and delicious it is amazing.

Perfect pastry ingredients and directions

If you want to get a bit more complicated here is an easy pie shell recipe that makes really one of the best crusts I have ever made.

3 cups flour

1 tsp salt

1/2 c cold butter

one egg

1/2 c cold lard cubed (or shortening)

2 tsp vinegar

two tsp lemon juice

ice water

In a food processor blend flour and salt and cut in butter and lard until fine crumbs. Beat egg separately in a liquid measuring cup until foamy and add vinegar and water to make 2/3 of a cup. Add egg mix all at once to stuff in processor and mix until it clumps but don’t let if form a ball. Remove and press together into 2 disks and refrigerate 30 min (up to 3 days or freeze 3 mos). Let stand at room temp 15 min before rolling. Bake 450 F for 10 min (rememember to poke with fork on bottom or add pie weights)

Makes 2 single crusts or 1 double 9 or 10″

Strawberry pie part 3
this baby won’t last long…
stawberry pie and jam
now I’m just showing off…