Foot Pain – the pain of plantar fasciitis

Plantar Fasciitis – Um …. what?

For those unfamiliar with the term plantar fasciitis, a quick definition:

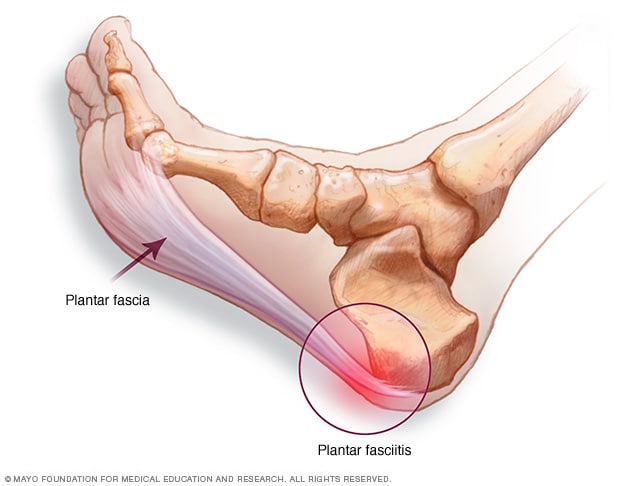
Plantar fasciitis (PLAN-tur fas-e-I-tis) is one of the most common causes of heel pain. It involves inflammation of a thick band of tissue that runs across the bottom of your foot and connects your heel bone to your toes (plantar fascia).

Image result for plantar fasciitis definition

This is according to a quick Google Search… clear as mud now?


Some important points

Not all heel pain is plantar fasciitis

There are some key features that we as practitioners look for including: “it feels like I am walking on broken glass”, it is worst first thing in the morning or after I have been sitting for a while then I stand up and walk again, and “nothing seems to help…”


Ok so what can we do about it?


Even if you have had treatment and no success in the past there is still hope.  I have helped lots of people with this condition basically because I tend to try to throw everything I know at it – it is a stubborn one so I have found over the years that is what tends to work.

Here is what I do:

Prescription of orthotics

hands on therapy including adjustments in the lower back and ankle

Graston technique

Cold laser

Kinesiotape application

prescription of specific exercises

and this one is key:  do not go barefoot – I mean at all – running shoes and orthotics on as soon as you roll out of bed in the morning (this isn’t forever – just until it heals).

Here is why:

The plantar fascia is a thick band attached to the heel bone.  Despite what it says above about inflammation plantar fasciitis is actually a micro tearing (or even a macro tearing) of this fascia away from the bone.  It hurts every time you stand after laying in bed for 8 hours because it has started to heal and then you stand up and tear it away again. Orthotics are crucial because they help approximate the bone and the tendon, not allowing it to pull away as much and tear away repeatedly…. this gives the body time and a chance to actually heal the damn thing!

More clear now?

So anyways, even if you have had this for a while, there is hope and help out there!


Killer Mojito Recipe

A Mojito recipe from the Mojito Master

yep, that’s me. Mojito master. It is pretty universally agreed amongst all who have tasted my famed mojito that I kill it.

I planted mint in my garden and have let it pretty much take over a good corner… I highly recommend this so that you can always have a fresh supply.

As luck would have it I noticed last week that the mint was ready

so here we are  – Early June and HOT… way hotter than usual at this time of year. So today I sent the hubby on a special errand to the store to buy limes and simple syrup.  We buy the simple syrup made by Presidents Choice – which is very good.  You can make it on your own but the PC brand keeps longer in the fridge.

To make your own simple syrup

mix 2 cups of water with 2 cups of sugar and heat until all of the crystals dissolve.  Cool – ya that’s it.


An important note on limes

For a good Mojito I prefer regular limes to key limes – this isn’t a Corona afterall…


Ingredients

For one Mojito you need:

1/2 to 1 lime

12-20 leaves of mint muddled in glass

1 oz simple syrup

1 to 1.5 oz rum (I prefer dark rum)

soda water

ice


Directions

muddle the mint leaves directly in your glass.  Add rum,simple syrup and squeeze lime over top.  Mix with spoon. Cover with ice and then top up glass with soda water (use a small highball). 


Today marks the first of our summer Mojitos drunk while watching the Stanley cup Finals with the Golden Knights and Capitals tied at 1-1 in the series.  What else could be better?
Enjoy!


Chocolate Avocado Pudding

Healthy Chocolate pudding

Love chocolate but not all the sugar and crappy stuff that typically goes in chocolate recipes? Here is a creamy awesome chocolate pudding made with the good fat of avocados and very little sugar that can be made vegan and nut free.  So healthy, so yummy.  Give it a try – you wont be disappointed.

the ingredients

for this chocolate pudding the ingredients you will need are the following:

4 very ripe avocados

1/4 cup chocolate milk or plain (also can use non milk substitute like almond milk or rice milk)

5 tablespoons cocoa powder

2 teaspoons vanilla extract or paste

1/4 teaspoon salt

1/4 teaspoon maple syrup or agave


optional 1/4 teaspoon ground cinnamon or cardamom


Directions

combine cocoa powder and honey and whisk until combined well. Set aside.  Put the rest of the ingredients in a food processor and blend really well.  Then at cocoa mixture.  Put in half cup portions in small dishes or ramekins and cover with plastic wrap and refrigerate for several hours before serving. This is best served within 1-2 days.

Give this one a shot and add more good fats and green stuff into your diet while hiding it with chocolate 🙂


Killer Guacamole with Bacon – Southampton BeAcH HoUsE style

Long weekend Guacamole

With the first Canadian Long weekend of the summer upon us – the much anticipated May 2-4 or Victoria Day long weekend – many city dwellers are upon the roads (the 400 specifically) desperately battling traffic on the way out of the city to attempt to gain some peace and quiet (and maybe a little long weekend beer buzz) at the cottage.  We conjure up rest, beer, chips and dip and maybe guacamole…

Me, I am sitting here, dedicatedly typing away because I can not imagine leaving all of you in the lurch without a Sunday Recipe.

I love you that much.

Also, Leo and Ryan are at Hockey tryouts and we aren’t leaving for the cottage until tomorrow.

(Whatever)

Where this one came from – the back story

Ok, so this week’s recipe is long weekend and cottage inspired.  Specifically Port Elgin Cottage inspired.  This recipe came to me from a friend of mine who has a cottage in the neighbouring town of Southampton – her name is Tina (Hi Tina!)

I first tasted her legendary guacamole at a party at my neigbours (Ally that’s you) – this neighbour of mine is about as nutty as I am and throws the best costume parties every year.  Everybody dresses up and I mean everybody – ages 8 -82.   It is a blast.  Here are some of my costumes from over the years:

Enough back story where is the recipe already?

Ingredients for the best guacamole:

2 avocados

3 tablespoons onion diced

1/2 cup miracle whip

1/2 teaspoon chili powder

1/2 cup tomatoes diced

2 cloves of garlic (smushed)

4 pieces of bacon crumbled small


Smush up the avocado and mix everything together.

That’s it really…

Be careful though I really couldn’t lay off of this guacamole  – I had to walk away. (but then I kept walking right back over… ya, I don’t make it that often unless I want to eat the whole thing)


Let’s Talk – about anxiety

So I have anxiety

Many of my patients, friends and family already know this about me – I have battled anxiety. I try to be really open about this and talk about it.  Not only to help remove stigma (what that successful doctor person has anxiety?) but also, selfishly, to help myself.

In this blog I am going to tell parts of my story and journey and give some tips on what has worked… for me.

Hopefully you will find it helpful if this is also one of your struggles.

My Story

I think I have always tended towards anxiety. But the first time it really hit me in a debilitating way was 7 months after my son was born in the form of post partum depression and anxiety.

At that time I stopped sleeping, eating, enjoying life and knew I had a problem when I was thinking about turning the car wheel while driving on the busy highway and wondering if it would really matter.

I needed help and got it in the form of medication, therapy and exercise.

Since then I have gone through ups and downs but did not need the medication for most of the 6 or 7 years in between.   Then last summer, I did again.  Unfortunately I think that once you have had a serious episode of anxiety and/or depression you are more likely to experience another one.

What I have learned is that the medication can be helpful but for me, it is only one part of the story. I have learned that I need to do several other things to help myself and I do hope that I will never need it again.  This is a continuing journey for me but I am always learning, refining and adding to what I do for myself.  Here is some of what I do and, amazingly, now also what I teach my patients:

Things I find helpful for my own and my patients anxiety

meditation (daily)

reading personal development books

listening to inspiring audio books

visualization

probiotic supplements

proper nutrition

exercise

breathing techniques

practicing mindfulness

practicing gratitude (journals or thank you notes- HEY KAREN!!! Note to self: please get better at doing this more!!)

self-care

massage

chiropractic

positive self-talk

practicing feeling connected to everything around me


I try to do most of these things daily and the self care techniques (like massage and chiropractic) regularly.  While it is a process to learn to do some of these things I have found them extremely helpful in my life and in changing my outlook on life and developing a sense of inner peace.  I watched a great TedTalk yesterday though about this that I thought was spot on so I will attach that link here:


I hope you find this blog post helpful – I have lots more tricks and tips and I honestly think that my challenges have made me a better doctor.

Contact me anytime if you have questions or want to chat about any of this.

xoxo

Karen


The Benefits of Self Care part Deux

So I promised a Sequel

Last weekend I wrote a blog post about self care.  It’s importance, ways to do it: expensive and free.

I also went for the first time to Ste. Anne’s Spa last weekend.

Ya. This is the expensive version.

Ya. It’s worth it.  (Occasionally)

So here is my review and what I learned, and what I would do differently.

So first, why I needed self care – a review

Ok, well who doesn’t?

In case you missed it – here is an internal link to last week’s blog post:

The Benefits of Self Care

So I needed this really badly for a bunch of reasons:  Very busy life (check), busy mom (check), sandwich generation and taking care of my dad who has been ill and in hospital (check), as a result of prior mentioned stuff and other life stuff we had to cancel our last two vacations (check).  So as a result I have been feeling extra tired.

I decided to take some of the money that I would have spent on vacation and take myself to Ste. Anne’s Spa for the day with a girlfriend. It was pricey but totally TOTALLY worth it.

What I loved and what I would do differently


Things I wouldn’t change:

So the food at Ste. Anne’s is amazing.  The whole day I felt well cared for, nourished and pampered.  I ate stuff too fast and forgot to take pictures…. oops sorry.

My first treatment on arrival at 9 am was Reflexology – my first foray into this treatment – basically foot massage based on acupuncture principles.

Would I do this one again? Oh ya.

I also had a chance to enjoy the beautiful grounds with my friend Adit- we sat in the sun (got a tiny burn on my leg at some point eventhough it was early spring) and had the front yard to ourselves at one point.  Got to listen to the birds and watch these pretty orange dudes while I was landed upon by a butterfly. What magical place did we drive into today?

Things I would do differently:

I wore a one piece bathing suit.  This was a mistake.  Too hard to change to pee – and because of the treatments, tea, water etc… there was a lot of peeing.  Wear a two piece.

The second treatment I chose was a Eucalyptus Wrap.  While this thing was great – it is likely the HOTTEST wrap at Ste. Anne’s.  I think that I booked this when it was winter and I was cold.  The treatment was amazing – they wrap you in hot damp blankets that have been steamed with Eucalyptus oil.  Then they wrap you in plastic to keep the heat in.  Then they put ice cooled cloths on your face and neck and do an ice cooled facial. The contrast between hot and cold is amazing.

Would I do this one again? Personally no.  I really don’t know why I booked this one for myself, I don’t do great with lots of heat so it was a bit of a miscalculation on my part.  Super hot.  I like it but it took a bit for me to cool down and recover.

Final thoughts

If you have a chance and can get out once in a blue moon to Ste. Anne’s for a day spa and some fancy self care go for it.  It was a great rest, a great treat, a wonderful day and I came back feeling quite recharged.

http://www.steannes.com/

Here are some more pics


Kombucha Recipe

Ever heard of Kombucha?

You may very well have as it is all the rage right now.  It is a fizzy tasty fermented tea that you can buy in bottles at many health food stores and upscale markets… even Costco sells it now because it has become so popular.

One issue it is $4 a bottle on average (ouch)

Wanna learn to make it for pennies a bottle?  Ok maybe a nickel since we don’t have pennies anymore…

If so read on…

What you’ll need:

This kombucha recipe (and my first scoby) came from a patient’s girlfriend so thank you so much Candace!  This is posted with permission…

-Black tea (you can experiment with other teas but always have a back up scoby incase it gets mold, I’ve only used black tea and never had mold)

-Cane Sugar (can use other sugar but this one works best for the majority of brewers)

-Flavouring of your choice (berries, ginger, hibiscus, orange are some examples. This part is experimenting and finding what you like best)

-Non-metal spoon

-Kombucha starter

-Filtered water

-Scoby

-Container

-Vinegar

-Bottles


What the hell is a Scoby?

According to the Google:

Image result for scoby

Scoby” is actually an acronym: Symbiotic Culture Of Bacteria and Yeast. And that’s exactly what it is! A scoby is the living home for the bacteria and yeast that transform sweet tea into tangy, fizzy kombucha — think of the scoby as the coral reef of the bacteria and yeast world.
You can make your own scoby and if you want to see this article:
https://www.thekitchn.com/how-to-make-your-own-kombucha-scoby-cooking-lessons-from-the-kitchn-202596
It is easier to get one from someone – that is how I started. Each batch or two of Kombucha you should have a baby scoby and can give away your older one (though I suggest keeping a back up scoby in a ‘hotel’  (vessel with the scoby and some of the post brew tea and yeast) in case you somehow grow mould.

Why is Kombucha so popular

So, it is fizzy and tasty.  On top of that it is very healthy.  A way way better option than pop.

Kombucha is a fermented tea so it comes by its bubbles all naturally – fermented products have probiotics in them. Probiotics are important for gut health and their lack or imbalance in the microbiome of the gut have been tied to obesity, anxiety and depression and many more health related problems.  So, we should all be taking probiotics and eating probiotic rich foods like fermented one (kombucha, sauerkraut, kim chi, apple cider vinegar to name a few) as well as pre-biotic foods (foods that feed the microbiome like dandelion greens, onions and jicama).

Ok, on to the fun stuff…. the recipe.

Here is a Helpful chart


Kombucha Instructions


  1. Make sweet tea according to chart on page 3 depending on the size of your container and starter given (you can add majority of the water directly to the container, just keep some to make the tea).
  2. Steep the tea for 10 minutes, add the sugar to dissolve.
  3. Allow tea/sugar mixture to cool before adding to the container.
  4. Add the kombucha starter to the container.
  5. Add the scoby to the container.
  6. Cover with breathable cloth and secure with rubber band.
  7. Let sit for approximately 7 days (this varies depending on the temperature of your house and sweetness preference).
  8. At day 7 you should see a baby scoby has formed on the top of the brew (looks like a thin cloudy white layer).
  9. Remove the scobies and set aside in a container (the mother scoby will always be thicker than the baby scoby).
  10. Taste test the brew (should taste similar to apple cider, if it is too sweet put the scobies back in and allow it to sit for a couple more days. If it tastes too vinegary, shorten the ferment time next brew).
  11. When you are happy with how it tastes its time to bottle.
  12. Give the brew a big stir with a non-metal spoon to distribute the yeast evenly (this will help with carbonation).
  13. Remove kombucha starter for the next brew if using a 2-gallon jar this would be 4 cups worth.
  14. Bottle the remaining kombucha leaving about an inch of headspace on the bottles. (swing top bottles are preferred, if using another type of bottle be sure to check on it during the second ferment).
  15. During the second ferment is where you can experiment with different types of flavours. Keep in mind the sugar content of what flavours you decide to use. (for example: if using mango and ginger, the mango will be ready before the ginger)
  16. Secure the bottles with an airtight seal, if using screw top bottles make sure they are as tight as possible or your kombucha will be flat.
  17. Allow to sit on the counter for 2-4 days (swing top bottles are safe to leave, screw top bottles will need to be checked. You can leave the bottles longer but they may need to be burped, you can do this by slightly opening the cap and sealing it again to release some of the air)
  18. Once the bottles are ready, transfer to the fridge.
  19. The bottles will have formed little baby scobies in them; I personally strain them out before I drink it. They are safe to swallow if you don’t mind the texture.
  20. Make a new brew and repeat the steps, add the baby scoby to your new brew.
  21. Mother scobies can be stored in a hotel (separate container of backups). Store in cupboard put enough kombucha tea in to cover the scoby. If you do get mold you can use the starter tea in your hotel to make a new batch.


The Benefits of Self Care

Self Care the buzz words

So I tend to see articles about self care all over the place these days.  On facebook groups, the internet, tv commercials, radio ads – really these buzz words seem to be everywhere lately.

Maybe I am just noticing it because I need some of my own?

So today I am going to talk about why I need to do some of my own self care, what I am going to do/have done, and some recommendations from me the person and me the doctor.

Why I need to do some self care around here

So, if you have been following me for a while on this blog or on facebook you may know my Dad has been ill.  Today as I write this he has been in hospital for almost 3 months.  One week ago he was transferred (finally) to a rehabilitation hospital after suffering a subdural haematoma (brain bleed).  It has been a long road and as I write this I know he will be in rehab until at least June 18 and probably longer.  In addition, when he was in the hospital I went every day to see him, had to advocate (and really fight every step of the way) in order to get him to rehab.  The whole experience left me quite jaded towards the medical system and extremely tired.  And we have a long long way to go.

Fortunately, he is finally where he needs to be and the care he is receiving seems to be terrific (remember I’m currently jaded and distrustful).

Ok, so in the mean time – I haven’t had a vacation since last March (2017) – one got cancelled due to my husband taking a new job and the last one we couldn’t go because Dad needed us here.

So what am I going to do about getting myself some self care?

I booked a day at the spa (St. Annes’s) and I have never been before… I was supposed to go April 15 and…. Ice storm. Of course.  Luckily, my friend and I were able to reschedule for May 6 which as I write this is tomorrow.   Yay!

I have always wanted to go to this place and a whole day at the spa sounds like great self care to me! I will update this section after I attend tomorrow!

Not to be all advertisy like but here is Ste. Anne’s website in case you want to check it out… I hope I like it!      http://www.steannes.com/


After Ste. Anne’s Spa

Back from my day spa experience. It was amazing. so relaxed.   Whose idea was it to write some stuff tonight? Bad idea.  Too relaxed. Instead I will do a whole post on what it was like and what I learned as well as stuff you can incorporate at home for self care next week.

Going to bed and doing a reverse sleep in instead (see below).  Night night!


Other things that are great for self care

Ok, so we all can’t go running off to the spa all the time – for two reasons: Cost and time.  So what other self care can you do if you just have a little time?

Me the doctor says:

take care of yourself physically and mentally –

get adjusted

get a massage

have a reverse sleep in (go to bed really early)

make sure to eat regularly and consume healthy food

take a hot Epsom saltz bath

do some exercise

do yoga


Me the person says:

hang out with a friend (no kids allowed)

have a glass of wine

read a fun book

get some quiet time to yourself (even if you have to lock yourself in the bathroom)


Healthy and easy Pumpkin Pie Ice Cream Recipe

Want a Healthy easy ice cream?

well this on has only 4 ingredients and is low fat and no preservatives…I am always looking for interesting flavour ice cream that are nut free for my son Leo who has a nut allergy and this home made pumpkin pie ice cream recipe  fits the bill and is super easy.

I don’t remember where I got this one – likely on the internet somewhere as I didn’t invent it – if I stole it from you please let me know so I can give credit where credit is due!

Ingredients

Here are the 4 healthy ingredients for this ice cream recipe:

4 bananas

1 cup pumpkin puree

1/3 c maple syrup

1  1/2 tsp pumpkin spice


Recipe Instructions

Here are the super complicated instructions for this recipe.  Are you ready?

Ok, blend all ingredients in a food processor.  Put in plastic container.  Freeze for 1-2 hours until frozen but still soft.

That is it. Seriously.

I tried this beauty last summer but did not take a pic – I will remedy that asap but here is another pic of pumpkin pie ice cream to hold you over…


Piriformis Syndrome – another pain in the butt

So, your but hurts?  We previously talked about how sciatica can cause a pain in the butt… but so can piriformis syndrome.

What is Piriformis Syndrome?

The Piriformis is a muscle in the rear end. In your butt. Wheusn it gets tight you can have pain in the tush.  How many more words can we find fro butt? This is fun…

Ok, Ok, so pain in the rump.  What else?  So because the sciatic nerve runs right under (and sometimes in some people it runs right through it).  Nerves don’t like being squished.  When you squish a nerve they do things like get all tingly or numb.  The sciatic nerve, if squished by the piriformis muscle can cause pain, tingling and/or numbness down the leg into the thigh, lower leg and/or foot.

What can you do about piriformis syndrome?

Several things can help with piriformis syndrome:

stretching

ice

massage

and of course chiropractic care.


What causes piriformis syndrome?

The piriformis muscle can become tight for any number of reasons and cause piriformis syndrome. Many things including prolonged sitting, injury, prolonged standing and repetitive strain can cause this problem.  It is really common in runners.


Easy stretches

One thing that you can do to help a tight piriformis muscle is the piriformis stretch.  See the YouTube video of me doing this one…  Remember to hold a stretch for 20-30 seconds at a minimum to have it make an impact and lengthen the muscle.