My favorite Essential Oils

I fell in love with essential oils

Sometime last fall (it was October) I was introduced to the world of essential oils.  A little late to the party maybe but I have made up for it with enthusiasm.  Since then my collection and understanding of these beautiful oils has grown and I have incorporated their use in my practice in several ways.  I like to diffuse different oils almost daily, I use some specific oils for sore achey muscles of my patients, and other oils for protection against the spread of cough/cold and flu.

I will talk in this quick blog post about some of my faves so you get a taste – a very small one) of what is out there in the world of oils…

A word on purity

So as it was explained to me when I started using and learning about essential oils, our laws here in Canada that govern them is …. odd.  Because they are classed as a beauty product you really need to be careful what and where you choose the brand of oil you use.

Bottom line – do your research.

Just because a bottle says it is 100% pure doesn’t mean that it is what you think it is.  By law, in order to say that on the bottle, apparently only 5% of the contents of that bottle must actually be 100% pure.  Weird and aggravating right?

So, do your research and find some companies that are actually putting 100% pure oil in the whole bottle, not just 5%.  Otherwise you may have reactions and or allergies to the oil, and who want to breath in more chemicals or put them on your skin?

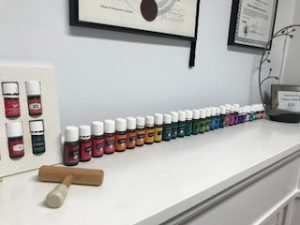
I use Young Living which but there are some other brands out there that are good as well (I just feel YL is the best in my opinion).

Favourites

Ok with that out of the way, here are some of my faves:

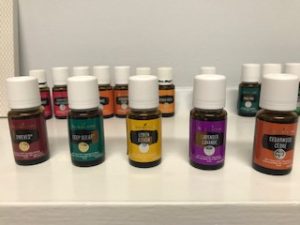
Theives:  A mixture that smells like Christmas – I diffuse this all winter to help ward off cold/flu transmission in the clinic – and amazingly I didn’t get sick at all last winter.

Lemon: A high frequency oil that never ceases to make me feel happy – its a lovely light scent and who doesn’t like some citrus?

Deep Relief: great for sore muscles – I use this on patients sometimes when I need to get deep into their muscles.  Patients love this one – it feels cool and tingly and smells peppermint-y and lovely at the same time.

Lavender – great for relaxation and to induce a sense of peace and calm.  Try placing a couple drops in a spray bottle full of water.  Spray your pillow before bed and it will help you relax into sleep and sleep better.

Cedarwood:  This one is good for people with trouble sleeping.  Diffuse this as you are trying to fall asleep.  Has a musky scent that men may prefer over the flowery lavender scent.


Some more things about oils

There are even some oils that are specifically classed here in Canada that can be used in food and baking – they undergo different standards for this process.  Young living has several in this class including peppermint and lavender – Lavender brownies anyone?


Mom’s Apple Crisp

Apple Crisp for Fall

So last weekend my family went apple picking.  It was 30 degrees Celcius out and not feeling crisp and fall-like but it was still super fun and we got a giant bag of apples out of it, got outside and had some fresh air and family time…

  Typical Family Portrait

Apple picking is one of my favourite fall activities and I tend to pick too many apples every time we go.  This usually means I make a ton of apple inspired recipes – this year the first of which was my Moms apple crisp.

I actually adapted a recipe found online because I couldn’t find Moms actual recipe but my sister had some and said it was just like my Moms.

A funny Apple Crisp Story

This story is one of family Legend…. I share it here because it makes me smile and think of my Mom, who was a wonderful Mom and person – you would all have loved her.

Mom loved to make Apple Crisp in the fall.  She made it for Thanksgiving every year and in giant quantities for the 23-26 family peeps who came over to our house every year for Thanksgiving.  People loved it. People looked forward to it.  It was a recipe that she could probably make from memory.

This particular time she was really just making it for my immediate family I think: my Dad, my sister and me.

Cut to the evil villain in the story:  Salt

More particularly Salt and Sugar in very similar containers…

you can see where this is going right?   The recipe calls for about 1 cup of white sugar along with cinnamon and flour to be mixed together then coat the apple slices…. this is approximately what our white sugar container looked like:

Image result for 1970 glass sugar, flour container with cork top

(actually it is exactly this – I can’t believe I found it on the Google!)

Guess what the salt one looked like:

you bet:

Image result for 1970 glass sugar, flour container with cork top

(only a bit smaller)


So Mom proceeded to make the whole apple crisp and guess what…. yup – salt instead of sugar and a whole batch in the garbage.

Yesterday I told my sister I was making apple crisp (but not with salt) via text and she smiled fondly, laughed and texted back that she was coming over for a taste… sometimes an annoying mistake can be remembered very fondly even 20-30 years later and is better than a perfect batch anyways.

Ingredients

ok here are the apple crisp ingredients

  • 12-14 small to medium apples (I used Cortland which are good for baking)
  • 1 cup white sugar
  • 1 tsp flour
  • 1 tablespoon cinnamon (or more to taste)
  • 1 cup or so of water


for the topping

  • 1 cup rolled oats
  • 1 cup dark brown sugar firmly packed
  • 3/4 cup flour
  • 2/3 or 1 cup melted butter
  • 1/4 tsp each of baking powder and baking soda


Directions

Pre-heat oven to 350 F. Peel, core and slice apples and place in 9×13 glass baking dish.  In a separate bowl combine sugar, cinnamon and flour and mix well.  Pour on top of apples and mix well so apples are well coated.  flatten out apples so they are mostly even in dish then pour water over top evenly over all apples.  In yet a separate bowl mix topping ingredients well then sprinkle over all of the apples.  Bake approximately 45 minutes until bubbling and topping is golden brown.  Serve with whipped cream if desired (and who doesn’t desire whipped cream?)

My Watermelon Birthday Cake

Amazing but healthy cake

So here I am trying to be healthy and eat well and along comes my birthday.   So what does one do?  Make a healthy Watermelon Birthday Cake!

This recipe is super easy…. and so very tasty – way better tasting that I even imagined it would be – I actually felt this would be a sacrifice but it really really wasn’t – I would totally make it again.

On top of that, it looks beautiful too!


Ingredients

Here is all you will need for this Watermelon Birthday Cake

(Ok you can make it anytime really not just birthdays!)

1 watermelon – seedless

heavy cream or whip cream

fresh strawberries

frozen blueberries

frozen pomegranate seeds


Directions

This Watermelon Birthday cake is so easy and of course no bake.  BUT it looks totally like Martha Stewart made it.  I even impressed myself… Here are the simple directions:

All you really need to do is cut the watermelon in half and take the ends off so that you have two rounds. Take the rinds off like this because it is easier – and then shaped them so they were a bit more round for staking on top of each other like layers in a cake (see picture). Then pat them dry so that the whipped cream wouldn’t slide off and placed the first layer on a pretty cake tray (the one pictured is my mother in law’s tray – super pretty).

I cheated and used a spray can of real whipped cream and then just put one watermelon round down and sprayed the top fully of whipped cream. Then sprinkle a mix of blueberries and pomegranate seeds on top that I had mixed together and allowed to thaw a bit before I started on the watermelon project.  I added fresh strawberries here and then layered on the second round of watermelon.  I then did the same with the whipped cream and berries artfully (also because I’m messy) dropping berries along the side of the cake.

That’s it.

I suggest you do all of the layering just before serving but you can cut the watermelon into shape prior to this… it worked great and tasted amazing!


I hope you try it!

Why go to a Chiropractor? Do I need a Chiropractor?

Do I need a Chiropractor?

Why go to a chiropractor? Do I need a chiropractor? People usually go to see a chiropractor when they are in pain.

We have mostly all heard of chiropractors in relation to back pain right?

That is a good thing -we are great at helping with back pain!  But it is only really part of the story. Here is a link to some of the other conditions I treat if you are curious: https://drkarenhudes.ca/index.php/conditions-we-treat/

Here is a fantastic link from the Ontario Chiropractic Association about what chiropractic is https://www.chiropractic.on.ca/public/what-is-chiropractic-2/

Without going and rewriting the whole thing basically I will quote one part:

“Chiropractors practice primarily using their hands, providing diagnosis, treatment and preventive care for disorders related to the spine, pelvis, nervous system and joints”

So if you have joint pain/injuries – there is heaps and mounds of evidence and studies that chiropractic care helps in all kinds of pain situations.  We provide safe, effective hands on care, exercises, advice etc to get you out of pain.  So if you are in pain the why go to a chiropractor is answered as – to get out of pain.

Q: I’m in pain, do I need a chiropractor?

A: Yep.

Ok but I don’t have pain…

I see lots of adults who aren’t in pain – usually once every few weeks or monthly.  Most of the time these people start because they are in pain.  They continue with care for several reason: they don’t want the pain to come back – but here is the biggie:  they often feel so much better during their care that they want to continue to feel this way.

Here is how it goes – you don’t notice how stiff or sore you are, or maybe you feel creaky and achy in the morning, or maybe you chalk up most of your aches and pains to “age”.  Read this carefully:  ACHES AND PAINS ARE NOT NORMAL – and guess what – you don’t have to live with them and YES they CAN go away.  So not only do I get rid of the pain that the patient feels that brought them to me in the first place – often they feel so good and no longer sore, achy or creaky that they want to come in monthly!

I don’t know about you but I want to live well and have mobility well into my old age – guess what – chiropractic can help with that!

So –

Q: I don’t have pain. Do I need a chiropractor?

A: Yep. You do.


What about my kids do they need a chiropractor?

Yep they do.

Listen the areas that don’t move in our spines… they accumulate over time.  The best way to prevent pain later in your kids is to get them checked periodically.  I see lots of kids and babies, treat my son and recommend coming in to get your kids spines checked at least periodically…. see the next section and my video too – maybe it will help explain why

Q: (in a little kid voice) Do I need a chiropractor?

A: yep.


One last thing –

Here is a quick little video that I made to help something a chiropractor treats – part of the chiropractic world calls it a subluxation.  Lets just call it an area of the spine that just isn’t moving through its normal range of motion for some reason.


Peach, Avocado and Tomato salad

Um… what now?

You read the title to this recipe and then said to your self… um… what? right? I am betting you did because really who thinks of peach, avocado and tomato salad?

As my friend Taryn, who gave me this recipe said – who thinks of putting those things together?  Sounds like it would be gross but trust me…. it so isn’t.

Taryn (aka T, Aunt T, or the fun police – she is a vice principal and I swear I have to get a t-shirt made for her) is a friend of mine from the cottage. She gave me this recipe on the beach on Saturday afternoon of the labour day long weekend and I literally had all of the ingredients and made this for lunch the next day.

It was so good that we were fighting over it.  Just got home after the long weekend and went grocery shopping and bought all of the ingredients again so I could make it this week… cant wait.   And Sooooo easy!

Look how gorgeous that is!

Ingredients

what you will need for the peach, avocado and tomato salad:

-3-5 peaches sliced and pit removed

1-2 avocados peeled and sliced wtih pit removed

a cup or two of cherry tomatoes halved

5-10 fresh basil leaves chopped

balsamic vinegar ( I used white balsamic for appearance)

Instructions

throw all bits together in a big bowl and toss – it is really that easy!

Did I mention so yummy too?

We try not to make things complicated around here…


I do recommend that you eat this the same day as it doesn’t keep too well because of the peaches and avocados – you won’t have trouble finding people to eat it anyways… that is if you decide to share!

If you liked this recipe I have other salad recipes on my blog – check out the blog page here and use the search function to search ‘salad’: https://drkarenhudes.ca/index.php/blog/