Mixed Green Salad

Amazing summer mixed green salad

I am sitting her typing this and eating the best mixed green salad ever.  My friend Penny Hounsome made it this weekend – and eventhough it is 4 days old it is still amazing and one of the best salads I have ever had for lunch.  I think what makes it so good is the mixture of flavours and textured. Luckily she gave me permission to share the ingredients…

Penny is a health and wellness coach, personal trainer and yoga instructor extrodinaire and you can find her here: http://www.pdhealth.ca

image1.jpeg

Ingredients

Here are the ingredients in this amazing mixed green salad:

romaine lettuce

bok choy

broccoli

cucumber

zucchini

basil

yellow peppers

dried cranberries

Swiss Cheese

pumpkin seeds


For the dressing I mixed a garlic infused olive oil and apple cider vinegar.


Seriously this mixed green salad is soooooo good!

Directions

really just chop everything bite sized (except chop spices more) and throw toegether – I don’t even like swiss cheese but it is so yum in this salad I love it. Not sure if I like it so much because of the taste (which is awesome) or because I didn’t have to make it – food other people makes is always better isn’t it?

Other notes – just throw in a handful of each of the pumpkin seeds, bluberries and cranberry – just a taste here and there is really good.  Also the zucchini is cut up raw and thown in.


Wrist Pain – Ulnar side

Some causes of wrist pain on the Ulnar side of the wrist

I was asked by someone do do a post on wrist pain for their specific problem – Ulnar sided wrist pain Ok, wait a second? what is the ulnar side?  That means the pinky finger side of the wrist…

Ok so there are some diffrent things that can happen here:

ulnar tunnel syndrome (carpal tunnel’s lesser know cousin)

TFCC injuries (triangular fibrocartilige complex)

arthritic changes

and ligament problems… to name a few.


After speaking to this person a bit over messanger it seems that she probably has a TFCC injury.

Here is where this is on the wrist: (thumb side on the right of this picture)

Image result for wrist bones tfcc

Case study

So lets go through this person’s wrist pain like a bit of a case study- stories make things a bit more interesting…

Ok, so she fell on an outstretched hand a couple years ago but a few years before that it had been bothering her – she isnt sure why.  Here is what it looked like when she fell:


Now, she has no numbness or tingling (asked this for the ulnar tunnel thing) and it hurts like hell with shaking hands, increased use and is better with rest and use of a splint.

So here I really thing she did something to this TFCC the cartilige at this part of the wrist when she fell…. so what can she do about it?

What’s next?

She has had this wrist pain for two years and had an ultrasound already… Well, she has been told she needs an MRI (which I also confirmed and recommended she do) – she may well be in for surgery but we won’t know this until the MRI results come back.  In the meantime splinting and rest are recommended in the literature.

Here are a few more things that I would try while waiting for an MRI if she were able to come to my clinic (she lives out of province… and unfortunately cant)

Treatment

For this type of wrist pain I would try Instrument Assisted Fascial massage – it may help to break up some scar tissue.

Following this I would use kinesiotape like this pic:

Image result for kinesio tape for tfcc tear

Carpal joint adjustments (a chiropractic thing)

and ice.

Here are some exercises I fould that also may help:

Image result for exercises for tfcc injury


So although this post is a bit specific for a TFCC  wrist injury – hopefully you find it interesting or helpful .  Also remember you can always ask me to post something specific for you and I will!

Corn Salad with Bluberries

Corn Salad with Bluberries Recipe

Corn and bluberries are not two things I would ever had thought to put together. But my friends Jodi and Jeff swear this salad is amazing and they even sent me their corn salad with bluberries recipe so I could put it right here on my blog for you!  They even sent their pictures!

I haven’t tried it yet but I intend to make it hopefully this weekend!

Ingredients

Here is what you will need for this yummy corn salad and bluberries recipe:

4-6 ears of peaches and cream corn cooked and cooled (or use canned)

1.5 cups blueberries

1/4 cup chopped sweet onion (they used red but I like sweet better)

1/4 c to 1/3 cup chopped cilantro

1 english cucumber halved and sliced or 1 red pepper cut in small cubes

Dressing:

2 tbsp lime juice

1 tbsp maple syrup

2 tbsp oil (chipotle infused or 1 tbsp hot pepper infused and 1 tbsp regular olive oil)

salt and pepper

Directions

Basically just take the corn off the cob, mix all chopped ingredients together in a bowl and in a seperate bowl mix ingredients for the dressing… then pour on top of the chopped ingredients and toss.  Ok, this is making my mouth water.

A quick shout out

So Jodi and Jeff are cottage friends – they swear by this oil for the salad – this is a small business in Southampton Ontario but I beleive they ship their oils… If you are up there near Lake Huron check them out – their oils are amazing… if you don’t have this one thats ok you can use any infused oil with some spice you like.

https://southamptonoliveoil.com/

Minor Ankle Sprains and Things You Can Do

Minor Ankle Sprains…

In this post I am going to talk about minor ankle sprains and some of the things you can do about them… While this advice is also good for more serious sprains it likely ‘wont cut it’ totally because, well, its more serious and may need more intervention. Rocket science right?

Why am I talking about this?

A couple reasons I want to talk about ankle sprains here.  One, people don’t always know I can treat sports injuries.  Many chiropractors are well versed and happy to treat most sports injuires.

Personally, I am a Rehabilitation Speicalist so I really am quite well versed in treating all sorts of injuries. This includes sports injuries and I may see these more often than a regualr commuinty chiropractor because of my specialty.  A little early morning education for you there! (I am typing this early on a Sunday… ok, more coffee… done… onwards!).

Another reason I am putting this out there is because I sprained my ankle last weekend.  It bugged me all last week.

Yup. that’s why really.

We were having a really glamours weekend last week.  We cleaned out the shed and the garage. Glamour, glamour all the time, right?

Ya so I turned my ankle really badly (at first I really thought I may have broken it).  I walked it off and it settled down – I got really no bruising and no swelling.   I promptly ignored it.

It hurt all week.

Finally, friday I decided to do something about the silly ankle sprain that was still bothering me. Doctor heal thyself – Right?

Doctors are the worst patients… truth.

What did I do?

Minor ankle sprains are really quite easy to treat.  So dont do what I did and ignore it for a week because you really don’t need to suffer uselessly.

Ok so I did a few things:  kinesiotape, instrument assisted fascial massage (IAFM), and laser.  Other things I would do for a patient include an adjustment (kinda hard on yourself but I have to go to a friend next week for that.  If the bones in the ankle arent moving properly there will be inflammation because of this and irritation to the surrounding tissues.  The likelyhood that they aren’t moving properly after a minor ankle sprain is pretty close to 100% IMHO)

Ok so what the hell is kinesotape and IAFM and laser and how do they help?

Kinesotape

Ktape is tape that has areas of adhesive and areas of no adhesive  – it is proported to do 4 things, 2 of which I think are real and valuable.

-hold the joint in place and provide support (ya I don’t think this is valid because of the movability of the tape)

-improve flow of lymphatic fluid decresing swelling – the tape lifts the skin by microns in some areas and not others because of its adhesive design – therefore the lymph can flow better and swelling can decreas (I think this is valid)

– decreases pain by activating touch receptors which interupt pain receptors mesages getting to the brain (also valid!)

-the fourth thing I forget and that is probably because I dont think it is valid either…

hey two out of four reasons for this to work is enough for me!

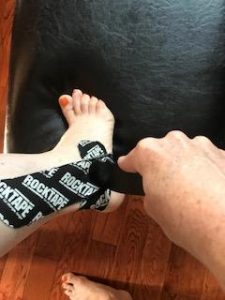
Here is how it looks on my ankle (spider veins and all)

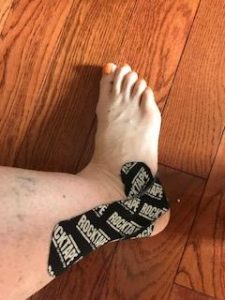
I am always surprised how well this works every time I use it on myself… really the pain almost disappeared enterly.
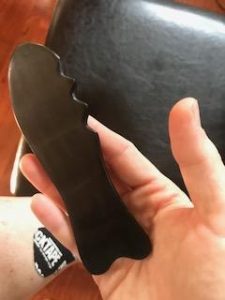
IAFM and Laser

ok so IAFM is good for all sorts of things – helping get rid of scar tissue from injuries is one of them. Without going into too much detail it involves using an instrument to scrape the tissue (gently at first) to help break down some of the scar tissue.  Scar tissue can be a pain generator so getting rid of it = less pain.

It can be a bit uncomfortable but I generally do this only for a few seconds per treatment so it is bearable.

Laser is helpful also with healing so I like to use it on lots of different injuries.

Other things you can do for ankle sprains

The old wisdom here is RICE – rest, ice, compression and elevation.

It is still advice I give to patients for sprains … did I do it? No. not really… honestly most of my patients don’t either since we all suffer from lack of time… but I like to throw it out there anyways.

Hope this was helpful!

“Crack” Chicken for the Instant pot

Addictive as crack?

Ok maybe not but this recipe comes from a site that claims it is so addictive that it is like crack cocaine… whatever.  Let’s not test that theroy ok?  Anyways this chicken recipe is for the instant pot, super good and easy and even keto frendly… Since we all know that Im currently searching fro new recipes this works for me!

Credit where credit is due

I got this recipe from here:  https://theketoqueens.com/keto-crack-chicken-recipe/

it is not mine I borrowed !

Also important – you can do this with frozen chicken as well as thawed or fresh!!! Did I say I love this instant pot thing?

Close Up of Keto Instant Pot Crack Chicken with Bacon and Scallion on Top

Ingredients

Here are the ingredients listed for crack chicken…. just reading them makes my mouth water!  I can’t wait to try this one out next week!

Ingredients
So originally I had posted the ingredientes and directions here… I thought that by giving credit to the website originators and posting their link they would be happy to share… Apparently not.
I just received this email prior to this being shared on my social media

“Hi Dr. Karen Hudes,
 
My name is *****    and I am one of the owners of the website TheKetoQueens.com. We appreciate that you liked our recipe enough to share it, but we are asking that you take down our recipe. Sharing our image and full recipe without our permission is copyright infringement.
 
We have no issue if you would like to share the image and a link back to our site for the recipe and ingredients, but we are asking that you immediately remove our ingredients and directions from your website.
 
We hope you understand.”
I guess they would like you to need to scroll through all of their advertising etc to get the recipe.  The recipe does look really yummy containing things like cream cheese, bacon and scallions and I definately will try it but I am not entirely sure I would have been infinging copyright here since I gave credit to them and posted a link to their site to drive traffic to them… I took it down anyways because they did ask.  Please click the link for the full recipe.

Poor Posture and Pro Pointers

Posture – good, bad and ugly

As a chiropractor I get a lot of questions about posture.  Many times I have patients coming to see me specifically for help with their posture.  Unfortunately there is no quick fix.  In this post we will go over some of the reasons for poor posture and some trick, tips and tools you can use to help to correct or improve it.

Poor posture reasons

So most of us sit way way way too long – in front of computers, in the car or on the commute, at home in front of the TV  – and when we do it we don’t always have the greatest way of sitting either.  We tend to slouch, poke our heads forward and round our shoulders as well as lose the natural curvature of our lower backs.

Add to this looking down all the time at cell phones and tablets (and typing blog posts on your laptop on the couch in front of the TV) and we have a recipe for pretty awful posture.

You end up looking like how you sit or stand most of the time.  Here is how it looks – rounded shoulders, gut protruding and chin protruding… not pretty and not healthy for your spine.

Image result for poor posture

we end up with short muscles in certain spots, and locked joints…and it makes it difficult then to straighten up.


So what can you do about poor posture?

  • make sure that your desk at work is ergonomically as correct as possible
  • limit use of phone and tablet
  • do exercises to correct shortened muscles and strenghten weak ones (these need to be specific for you – if there were generic ones I would list them for you here)
  • get chiropractic adjustments so you have a chance of moving the stuck spinal joints
  • use devices for retraining at your desk or at home – a good example of this is a Posture Medic- I recommend these for my patients but there are others out there

Image result for posture medic device

Here is a quick video I made about this cool contraption and how I instruct patients how to use it.


Instant Pot recipes for the beginier (aka me)

So I got a new Instant Pot

It was Amazon Prime day in July… I couldn’t help it. I bought an instant pot to my husband’s chagrin. (we already have way too many kitchen gadgets).

I am hopeful this new gaget will replace my slow cooker – It should, and take it’s cupboard space.  ANNNNDDD I hope it solves another problem – the one I have with forgetting to take out meat to thaw in the morning.  With the instant pot you can cook from frozen in 30 minutes – its true! I tried it!

At first I was a bit scared of the pressure cooker feature – while I never had one growing up my mom regailed me with stories of exploding pressure cookers in the 70’s – she was scared, and passed it to me.  Hence I have never had one.

Nowadays they make these things way safer… still though at first I was scared and ran out of the kitchen.  Old habits die hard.

Ok so here are two beginer recipes I have tried and one I will try this week:

Instant Pot hard boiled eggs

This one is so simple its crazy.  And it makes the perfect, most easily peeled hard boiled eggs.

Image result for hard boiled eggs

A perfect starter place…

Place eggs in the instant pot on the rack. Put in 1 cup of cold water into pot.  you can cook 6-8 eggs at a time – close the lid of the instat pot and make sure the steam valve is closed and in the sealing position – cook on high pressure for 5 minutes (manual or pressure cook setting).

When it beeps do a quick release of the steam (careful not to burn yourself! I always do this with silicone oven mitts on…) and submerge the eggs in ice water for 5 min so they dont over cook – use tongs!

Done! perfect and easy to peel every time!

Instant pot poached chicken breasts

Also super easy!

To make it easier make sure you freeze the chicken breasts individually – then you don’t have to fight to separate them – and they do need to be separated!

Ok so you can put in lots – you can stack the chicken breasts but make sure to separate – I did 6 the first time!

Image result for poached chicken instant pot

Steps:

put frozen chicken breasts in pit

add 1 cup of water or chicken broth and season with salt and pepper

Close the lid of the instant pot and move valve to sealing and press manual or pressure cooker setting and set timer to 10-12 minutes (12 was too long for me last time).  When it beeps let the pressure release naturally for 5-10 min and then release the remaining pressure – so easy!

If you do longer on the cook time the chicke shreds nicely for chicken salad.  Shorter and you get perfectly poached chicken… just make sure the internal temp of the chicken is 180F when you are done to make sure it is cooked through if you are worried.

Keto Pork Tenderloin in the instant pot

This one I haven’t yet tried as of the writing of this post – I will be trying it this weekend or early next week though… credit to this blog and more instant pot keto goodness here! https://www.savorytooth.com/instant-pot-pork-tenderloin/  I totally stole this whole thing from there…

cooked instant pot pork tenderloin drizzled with mustard sauce and onions

Ingredients

  • 1 pork tenderloin (1 – 1.5 pounds)
  • 1 small onion thinly sliced
  • 1/2 cup water
  • 1 tablespoon olive oil
  • salt and pepper

For the sauce:

Instructions

  1. Cut the pork tenderloin in half so it’s half as long as before. If unseasoned, season all sides with salt and pepper.
  2. Turn on the pressure cooker’s saute mode for medium heat. When the display reads HOT, add olive oil to coat the bottom of the pot. Add pork and cook until golden brown on one side, about 5 minutes. Flip to cook the other side for a few minutes. Transfer the pork to a plate.

  3. Add onions and cook for a few minutes, stirring frequently. Turn off the saute mode.
  4. Add water, stirring and briefly scraping up any brown bits stuck to the bottom of the pot. Return the pork to the pot, nestling it on top of the onions.
  5. Secure and seal the lid. Cook at high pressure for 4 minutes, followed by a 10 minute natural release. Make sure to wait the full 10 minutes; do not open even if the pressure is completely released before 10 minutes have elapsed.
  6. Uncover and insert a thermometer into the thickest part of the tenderloin — it should read 140-145 F. Transfer the pork to a cutting board and let it rest, where it will continue cooking. Do not slice yet.

  7. Turn on the saute mode. Add heavy cream and mustard to the pot, stirring together. Bring to a boil. Let the sauce boil for 8-10 minutes to thicken, stirring frequently. Turn off the saute mode and stir for a minute to let the boiling subside. Stir in parmesan cheese until melted.

  8. Slice the pork into thin slices and serve onto plates. Pour the sauce on top.